Posted 14 October 2013 - 06:21 PM
Here is it my first API for CC.
About:
A couple of weeks ago I started with Advancd Computers and Monitors in my FTB Unleashed and I was using DireWolf20's Button API, but I did not quite like his API, manually putting buttons on the screen is simply not my style and I also had to do some minor tweaks to his code. So finally I started to do my own thing and day after day new things were added to it until now where I think it's more or less usable by other people.
This is my first real Lua-project and also my first attempt OOP-style Lua. I'm quite shocked that everything seems to work fine.
Features:
Getting started:
Example:
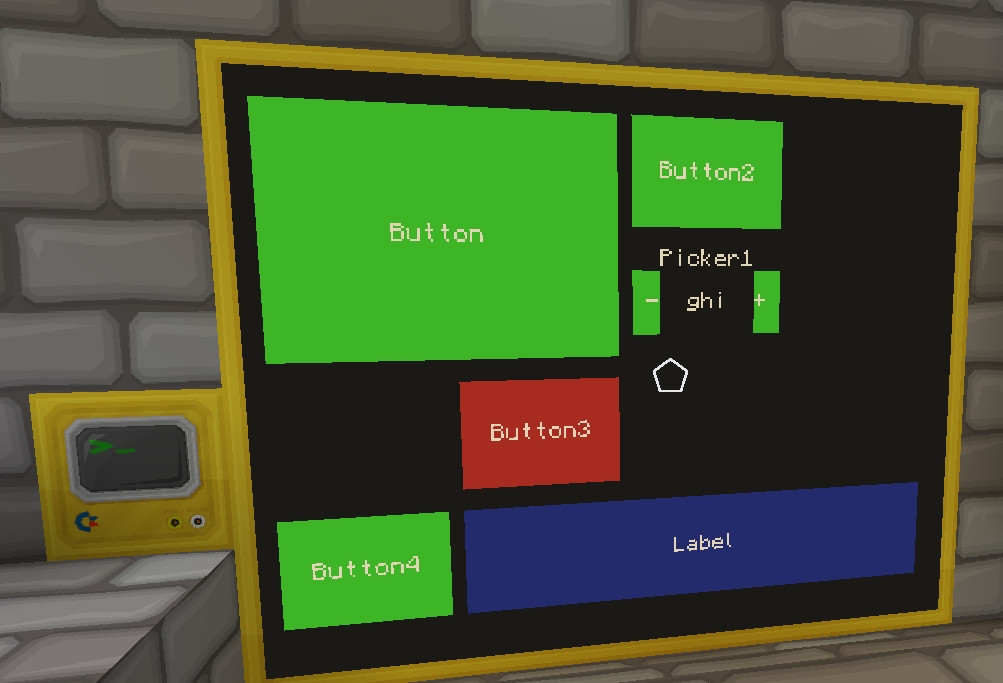
This is the code I used in the screenshot above with some minor changes, also added a lot of of comments. Pastebin: LijScy3g
Pastebins/GitHub:
http://pastebin.com/5qVa8CRF
http://pastebin.com/ZvUtcSv8
http://pastebin.com/g1Z0JAW1
http://pastebin.com/mK8ZHaZk
http://pastebin.com/LijScy3g
https://github.com/RoyalBingBong/ccGUI-API
Changelog:
About:
A couple of weeks ago I started with Advancd Computers and Monitors in my FTB Unleashed and I was using DireWolf20's Button API, but I did not quite like his API, manually putting buttons on the screen is simply not my style and I also had to do some minor tweaks to his code. So finally I started to do my own thing and day after day new things were added to it until now where I think it's more or less usable by other people.
This is my first real Lua-project and also my first attempt OOP-style Lua. I'm quite shocked that everything seems to work fine.
Features:
- Grid-like layout for the monitor. Specify a number of rows and column and add elements to each cell or to combined cells
- Different elements for the GUI: Button, Label and a "Picker" (the term I gave it, anyone got a better name?)
- Need a bunch of Buttons that should behave like RadioButtons? My API can do that!
- Setting colors for text, background and the different button-states (active, not-active)
- Setting position of text on a Label or Button, form top-left to bottom-right, your choice!
- Executing functions with specified parameters when clicking on a Button
- A Picker that allows you to "scroll" through a table with values, either your own values or a generated table with your desired range of number values)
- Full API documentation with LuaDoc
- .. I think that's it.
Getting started:
- Download my API:
- Execute rbbupdater. The updater automatically downloads the newest version of my API to your Computer.
- Load my APIs:
- Download the API documentation and find the stuff you need: https://www.dropbox....igk/API-Doc.zip
pastebin get SaCnHG5y rbbupdateros.loadAPI("RBB/helper")
os.loadAPI("RBB/guiElements")
os.loadAPI("RBB/screen")Spoiler
- Create a folder on your computer named "RBB".
- Download the files:
- Load my APIs:
- Download the API documentation: https://www.dropbox....igk/API-Doc.zip
pastebin get 5qVa8CRF RBB/screen
pastebin get ZvUtcSv8 RBB/guiElements
pastebin get g1Z0JAW1 RBB/helper
pastebin get mK8ZHaZk RBB/configos.loadAPI("RBB/helper")
os.loadAPI("RBB/guiElements")
os.loadAPI("RBB/screen")Example:
This is the code I used in the screenshot above with some minor changes, also added a lot of of comments. Pastebin: LijScy3g
Spoiler
-- load ALL the APIs!
os.loadAPI("RBB/helper")
	os.loadAPI("RBB/guiElements")
	os.loadAPI("RBB/screen")
-- Function for the Buttons, just prints the parameter
function fancyFunction(p1, p2)
print(tostring(p1) .. " , " .. tostring(p2))
end
-- Function for Picker, just prints the parameter
function incdecFunction(param)
print("incdec: " .. tostring(param))
end
-- Create a new Screen. The Monitor is on the "right" and will have a 4 by 4 grid
local rows = 4
local cols = 4
local thisScreen = screen.Screen.create("right", rows, cols)
-- Lets make some buttons
-- For more detailed info, look into the documentation ;)/>/>/>/>/>/>/>/>/>
local btn = guiElements.Button.create("1", "Button", false, fancyFunction, {"Button", "derp"})
local btn2 = guiElements.Button.create("2", "Button2", true, fancyFunction, {"Button2", "derp"})
local btn3 = guiElements.Button.create("3", "Button3", false, fancyFunction, {"Button3", "derp"})
local btn4 = guiElements.Button.create("4", "Button4", false, fancyFunction, {"Button4", "derp"})
-- Lets make some RadioButtons:
-- The radioIndex can be a string or a number, it's just there to group the buttons
btn3:setRadioIndex("herpderp")
btn4:setRadioIndex("herpderp")
-- And now a label
local lbl = guiElements.Label.create("123","Down here!",{h = "center", v = "center"})
-- and when where at it, lets turn the background of the label blue!
lbl:setBGColor(colors.blue)
lbl:setTextPosition({h = "right", v = "bottom"})
-- Now we create a "Picker". This one's a bit complicated
-- First two parameters are like button and label, but the 3rd is the starting index for the table in the 4th parameter
-- The index is 2 so we start with "def"
local picker = guiElements.Picker.create("picky", "Picker1", 2, {"abc", "def", "ghi", "jkl"})
-- Set the function that is called when the "-" is clicked
picker:setDecFunction(incdecFunction)
-- Set the function that is called when the "+" is clicked
picker:setIncFunction(incdecFunction)
-- Add ALL the elements to the grid
thisScreen:addElementToGrid(picker,2,3)
-- This ones is different! the buttons will have a 2x2 size
thisScreen:addElementToGrid(btn,{1,2},{1,2})
thisScreen:addElementToGrid(btn2,1,3)
thisScreen:addElementToGrid(btn3,3,2)
thisScreen:addElementToGrid(btn4,4,1)
thisScreen:addElementToGrid(lbl,4,{2,3,4})
-- This has to be called after adding all the elements, it just sets up each element...the automatic stuff ;)/>/>/>/>/>/>/>/>/>
thisScreen:initGrid()
-- Initially draws everything, only needs to be called once
thisScreen:draw()
-- Basic loop to get the touch events from the monitor and check them on the screen
while true do
event,side,x,y = os.pullEvent("monitor_touch")
thisScreen:checkTouchEvent(event,side,x,y)
end
Pastebins/GitHub:
http://pastebin.com/5qVa8CRF
http://pastebin.com/ZvUtcSv8
http://pastebin.com/g1Z0JAW1
http://pastebin.com/mK8ZHaZk
http://pastebin.com/LijScy3g
https://github.com/RoyalBingBong/ccGUI-API
Changelog:
Spoiler
v1.0
-Initial release


