PDF Version
I would appreciate it if you guys would take the time to make a comment on the tutorial if you find any issues/get any errors. It should be open on Google Drive to allow you to do it directly on the document itself, but I'd be fine with a comment here on the forums too. Thanks!
Spoiler
Updated note: For some reason the forums mess up the formatting towards the end of this post. Sorry about that :/ I'm afraid you'll have to use the Google Drive version for all of that information.Note: This tutorial is still quite rough around the edges - I would go so far as to call it a first draft. There are a few things I have planned to make it nicer, but this has all the important bits.
So you've played around with ComputerCraft for a while now - you like the automation and the power that in-game computers give you. And yet, you find that something is lacking. There are tasks that you wish to automate that are impossible to do using vanilla ComputerCraft. You want to have complete and utter command of your world, but you lack the tools.
If this sounds like you, continue reading. If not, continue reading anyway (you won't regret it!).
Making a peripheral for ComputerCraft is easy. All you need is a bit of Java knowledge, a working computer, and a few easily accessible tools.
The first thing you'll need is an environment to write your code in - I suggest Eclipse (Google it). Eclipse comes prepackaged with just about everything you need to succeed as a beginner-intermediate Java programmer, and it will give you the ability to easily write the code for your mod and explore the inner workings of Minecraft.
The next thing you'll need is the Forge API (Make sure to grab the src, not the installer or universal!!!). The Forge API is a Minecraft mod that provides many, many useful features to mod makers like you and me. One of its nicest features is FML (Forge Mod Loader). The Forge Mod Loader allows us to load mods into the Minecraft environment without any modification of the base classes. You'll quickly realize how handy Forge is after only a few minutes of messing around.
The third thing you'll need is a copy of ComputerCraft. In order to interface with ComputerCraft, we need the API. The API and its documentation is packaged in the zip file of the main mod, so it's quite easily accessible.
The last thing you'll need to have is a decent understanding of programming in Java. You can find decent tutorials on oracle's website.
Alright, now before we can get started, let me walk you through the set-up of all these tools.
1. Eclipse
Eclipse is quite easy to set up. Simply open the downloaded archive and extract it somewhere to your hard drive. I would suggest putting it somewhere where you won't accidentally delete it: for example, I put Eclipse in my Program Files directory. Once you've done that, you're basically done. We'll have to set up the "workspace" a bit later in the tutorial, but don't worry about it right now.
2. Forge API
Setting up the Forge API is nearly as simple as setting up Eclipse. Extract the files from the downloaded archive to somewhere on your hard-drive. I would put them somewhere clean - make a new folder for modding because we'll have quite a few files to store there.
Once you've extracted the API, look for the file called "install.cmd" (or if you are on a Unix system, look for "install.sh"). The installer goes out to the web and downloads everything Forge needs to run, which is quite a bit of stuff. It can take my slow internet up to twenty minutes to get everything downloaded. Once everything is downloaded, there's an additional wait while Forge actually decompiles Minecraft and applies its patches. You'll know that you're done when the prompt says, "Press any key to continue…"
3. The workspace
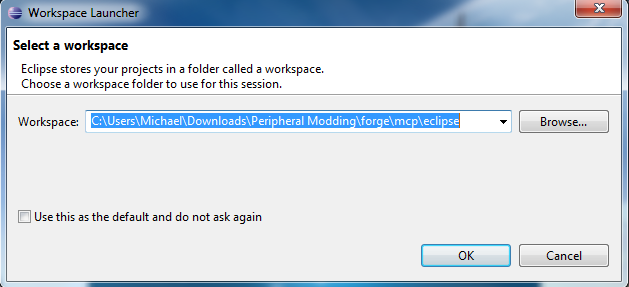
The workspace is essentially just the folder that contains all of our Eclipse settings. Forge is nice enough to generate a workspace folder for us when it's installed, so all we need to do is direct Eclipse to it. The workspace folder is found at forge/mcp/eclipse. When you open up Eclipse, it should be the first thing it asks you to do.
If you're still unsure, refer to the screenshot below:
4. The ComputerCraft API
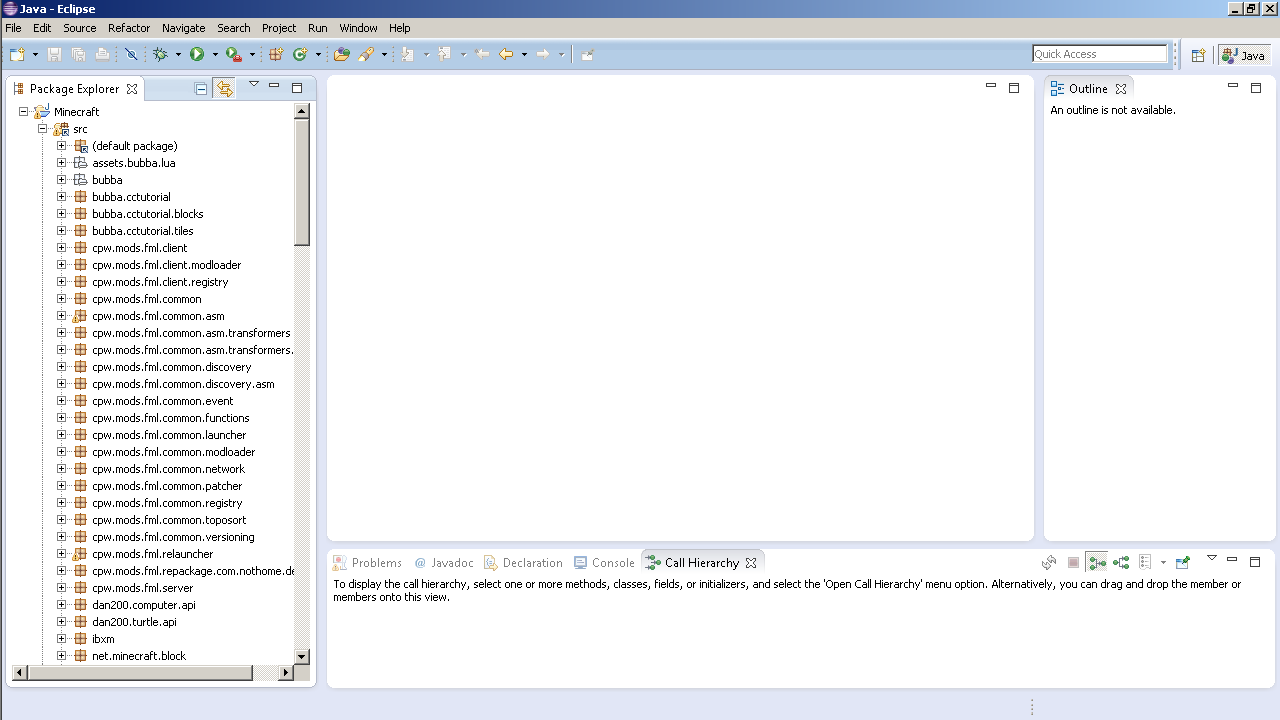
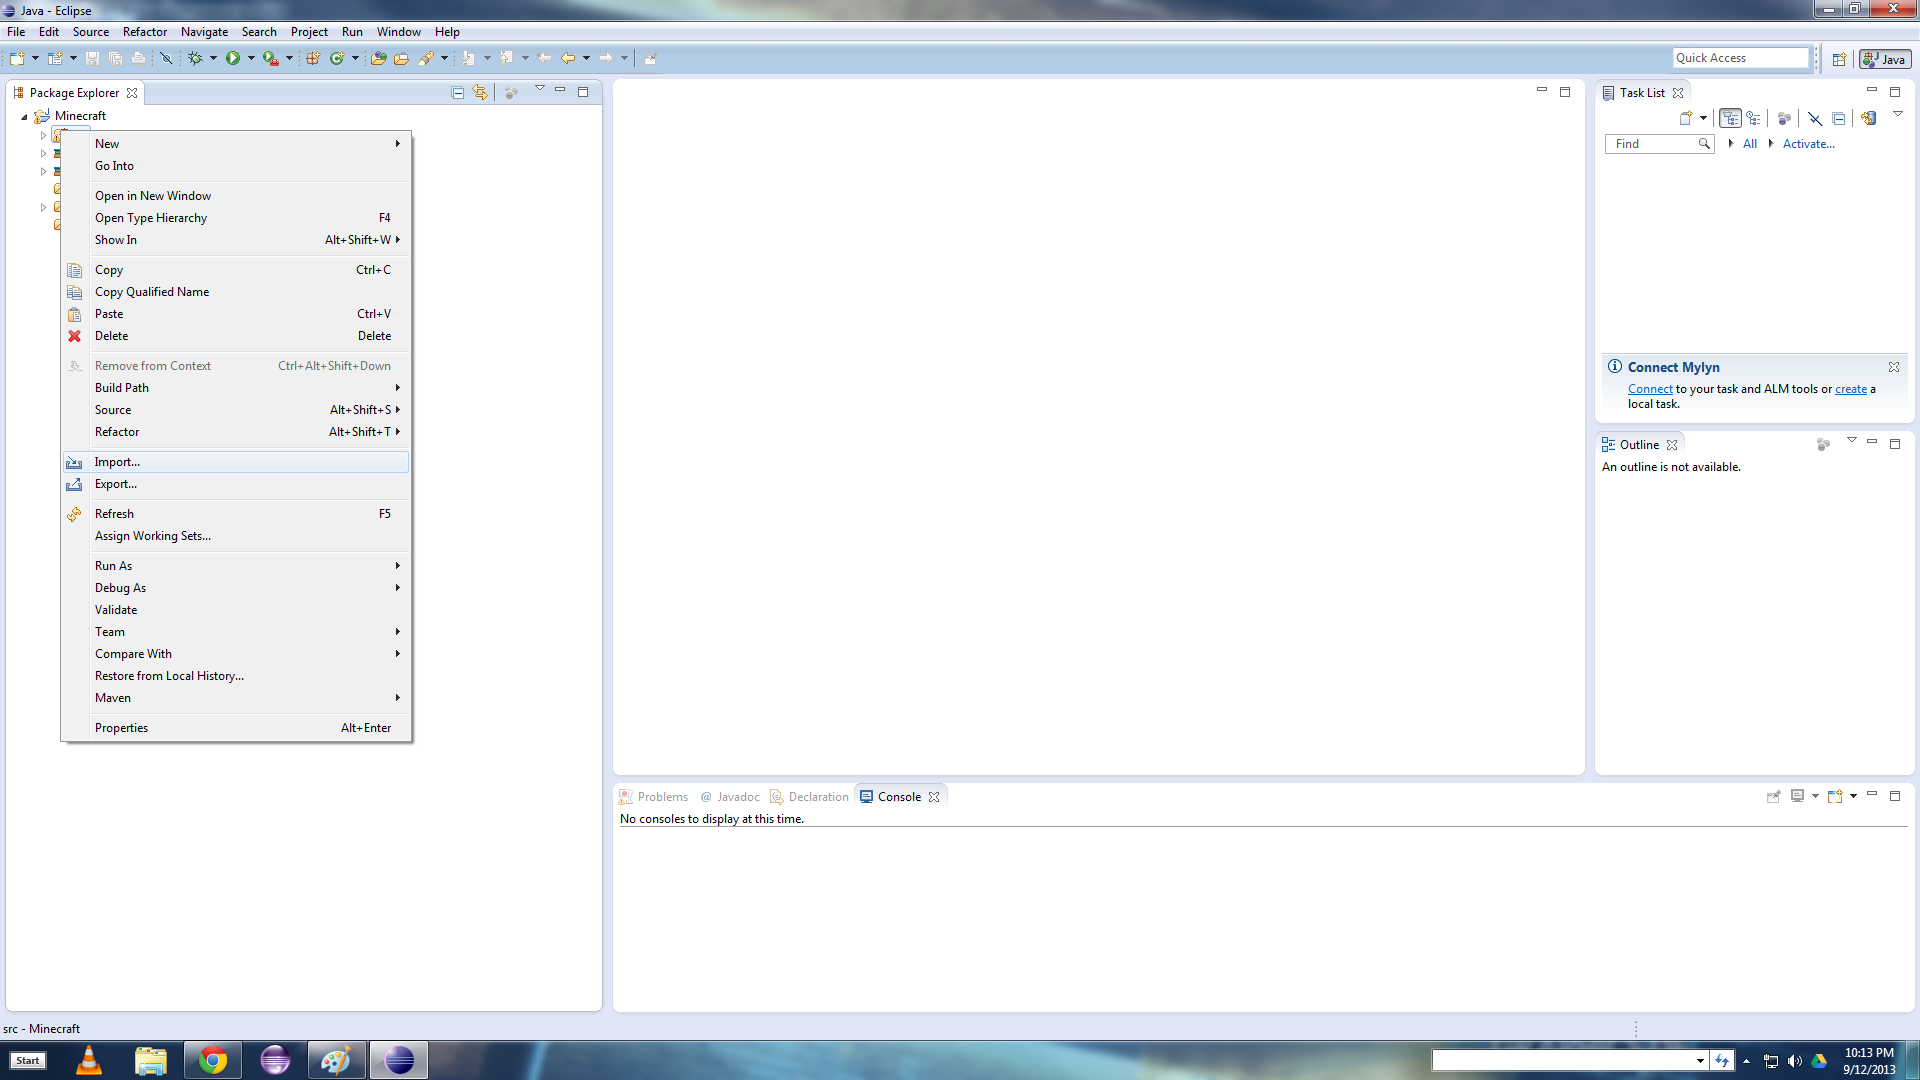
Now Forge is installed, and we are able to create a mod. However, in order to make a ComputerCraft peripheral, we need to first install the ComputerCraft API. Like I said previously, the ComputerCraft API can be located in the ComputerCraft zip file, so go ahead and extract the contents of that to somewhere convenient (ahem… the modding folder). Now go back into Eclipse. Look for the Package Explorer bar on the left side of the window, and hit the Minecraft drop-down. You should see a few folder-like icons. Right click on the "src" one and then select "Import". See the picture below if you're confused:
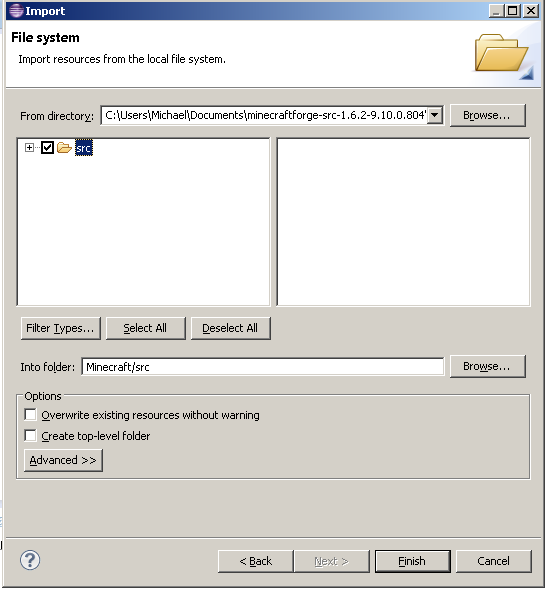
Next you'll want to type "File System" into the "type filter text" textbox. Select the only available option and hit Next. Now we need to direct the Import to our api. Hit the browse button next to the From Directory textbox and navigate to the subdirectory "api/src". The folder should pop up on the left side of the screen. Finally, Check the "src" box. Here's another image for ya':
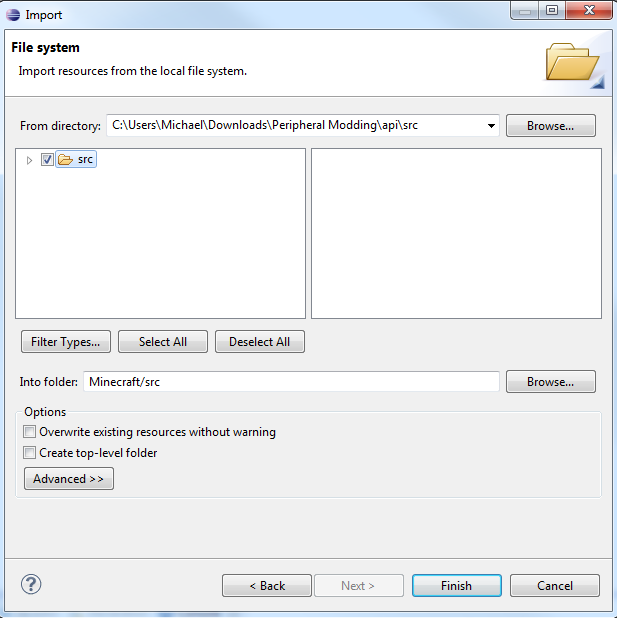
Hit finish and you should be all set - we're ready to make our peripheral.
Writing a mod with Forge is incredibly easy, and there are lots of resources in case you get stuck. A great place to learn how to write a mod is on the Forge wiki. I especially suggest checking out "Generic Mod", as it will guide you from beginning to end how to go about modding. If you are curious about something that I don't explain, a great place to start is there.
Now that the boring stuff is out of the way, we can finally get started with the code. The first thing we need to do is create a "package" that will contain all of our code. Packages are like Java folders, and they are a wonderfully powerful organization tool.
Create your package by right clicking on the "src" package and then going to "New->Package". A package name is by convention lowercase, and can contain periods to separate things into subpackages. I will go with the name "bubba.cctutorial".
Now create a class inside of [your package name] package in the same way that you created the package. Right click [your package name] and hit "New->Class". By convention, Class names start with an uppercase letter and seperate words using CamelCase. My first class will be called "TutorialInit", but you may name it whatever you like (Forge doesn't care).
By default, Eclipse generates a skeleton class that should look something like this:
Spoiler
package bubba.cctutorial;

public class TutorialInit {

}
In order to alert Forge that this is a mod that needs to be loaded, we are going to use the @Mod annotation. We can insert this anywhere between the package and class init lines.
Spoiler
package bubba.cctutorial;

import cpw.mods.fml.common.Mod;

@Mod(modid="bubba.cctutorial")

public class TutorialInit {

}
Notice the "import cpw.mods.fml.common.Mod;" line. This tells Java that there is something inside of the class that depends on a class external to that package. Importing things in Eclipse is easy - simply hover over a word that is underlined in red and hit "import". See the screenshot below for an example of this:
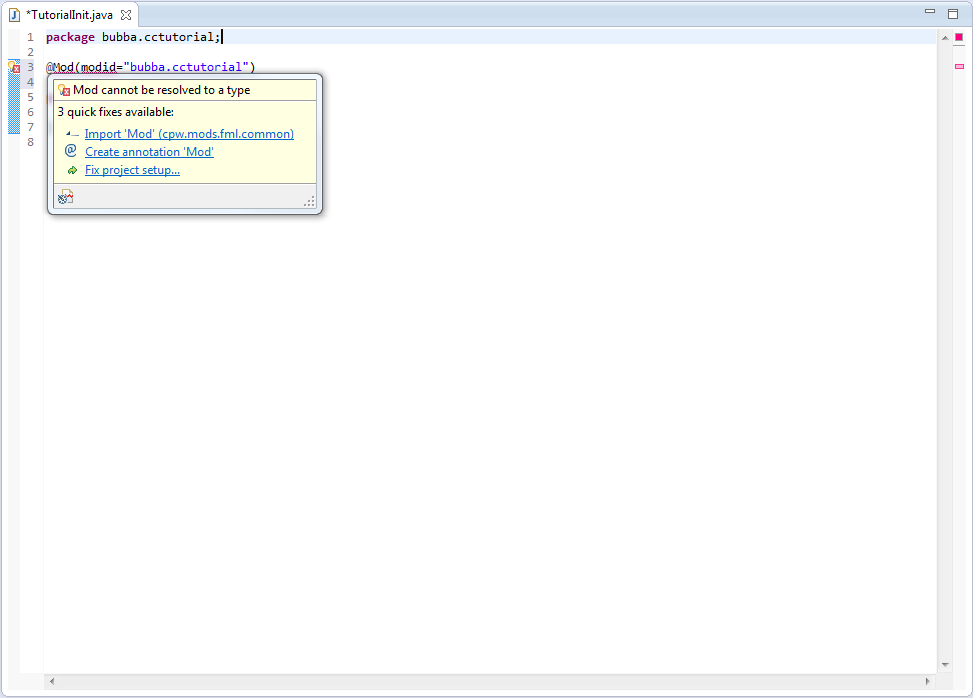
Next, we need to make sure that we specify whether the mod is required by clients attempting to connect to a server with this mod.
Spoiler
package bubba.cctutorial;

import cpw.mods.fml.common.Mod;
import cpw.mods.fml.common.network.NetworkMod;

@Mod(modid="bubba.cctutorial")

@NetworkMod(clientSideRequired=true, serverSideRequired=false)

public class TutorialInit {

}
clientSideRequired=true specifies that the mod is needed on the client side if the server has it. serverSideRequired=false specifies that we don't need the mod on a server in order to connect to that server using a client that does have it installed.
Next we need to go ahead and start making the class that defines our peripheral block (I'll go into making turtle peripherals a bit later). I usually make a new package for my blocks, just to keep things organized. Right click this time on "[your package name]" and add the new name onto the end of the one that is automatically inserted into the box. For example, I will now create a package called "bubba.cctutorial.block". Inside of this new package, create a class. By convention, block names are entitled "Block[Name]". I will call mine "BlockPeripheral".
Once again, we are greeted with the skeleton class. Go ahead and make this class extend BlockContainer, which is a block that has a Tile Entity (More on those later).
Spoiler
package bubba.cctutorial.block;

import net.minecraft.block.BlockContainer;

public class BlockPeripheral extends BlockContainer {

}
You should get a red squiggly underneath "BlockPeripheral". Hover over it and click "add Constructor". This is one of the reasons that Eclipse is super awesome (and somewhat bad for your memory). It will generate code for you if a subclass needs a constructor. Now we should have this:
Spoiler
package bubba.cctutorial.block;

import net.minecraft.block.BlockContainer;
import net.minecraft.block.material.Material;

public class BlockPeripheral extends BlockContainer {

	public BlockPeripheral(int par1, Material par2Material) {
		super(par1, par2Material);
		// TODO Auto-generated constructor stub
	}

}
Eclipse adds in that "// TODO Auto-generated constructor stub" junk. You can go ahead and delete it if you want, but it's not necessary. Also take note that I changed something from constructor generated by Eclipse - whereas before the constructor is protected, I have changed it to public. This is very important, so make sure it's public before continuing on.
You'll notice that the red squiggly has not gone away from the "BlockPeriphreal". That's because Eclipse has realized that we still need to have some more inherited stuff. Go ahead and hover over the word again, selecting "Add Unimplemented Methods".
Spoiler
package bubba.cctutorial.block;

import net.minecraft.block.BlockContainer;
import net.minecraft.block.material.Material;
import net.minecraft.tileentity.TileEntity;
import net.minecraft.world.World;

public class BlockPeripheral extends BlockContainer {

	public BlockPeripheral(int par1, Material par2Material) {
		super(par1, par2Material);
		// TODO Auto-generated constructor stub
	}

	@Override
	public TileEntity createNewTileEntity(World world) {
		// TODO Auto-generated method stub
		return null;
	}

}
Okay, now I should probably explain to you what all of this stuff does. But first, let me rename a few of the variables in the code so you can see what's really going on.
Spoiler
package bubba.cctutorial.block;

import net.minecraft.block.BlockContainer;
import net.minecraft.block.material.Material;
import net.minecraft.tileentity.TileEntity;
import net.minecraft.world.World;

public class BlockPeripheral extends BlockContainer {

	public BlockPeripheral(int blockID, Material blockMaterial) {
		super(blockID, blockMaterial);
	}

	@Override
	public TileEntity createNewTileEntity(World world) {
		return null;
	}

}
See that? The BlockPeripheral constructor is actually just calling its superclass with the arguments for its block ID and block Material. Whenever we create a new instance of the BlockPeripheral (for example, whenever a block of that type is placed), it will run this constructor with the said methods.
Now let's talk about the createNewTileEntity method. This method is also called whenever we place a new BlockPeripheral. A block with a tile entity is any block that requires more data than is regular (regular data being id, metadata, and position). It also allows the block to do an action each tick.
The tile entity returned by this method is going to control all the actual logic of the peripheral. The block itself will have nothing to do with it. Let's go ahead and make the tile entity class that this method will return.
First, it's time to make another package to contain all of our tile entities. Keep in mind that this is simply an aesthetics/organization thing and is not necessary for the mod to function. However, it is a good practice to get in to. My new package will be called "bubba.cctutorial.tile".
Once you've made the new package, go ahead and create a class. It will be a subclass of TileEntity, so go ahead and make it extend that.
Spoiler
package bubba.cctutorial.tile;

import net.minecraft.tileentity.TileEntity;

public class TileEntityBlockPeripheral extends TileEntity {

}
Now in order to make sure our block actually makes use of the TileEntity when it is placed, we need to go back to the BlockPeripheral class and change the return value of createNewTileEntity.
Spoiler
package bubba.cctutorial.block;

import bubba.cctutorial.tile.TileEntityBlockPeripheral;
import net.minecraft.block.BlockContainer;
import net.minecraft.block.material.Material;
import net.minecraft.tileentity.TileEntity;
import net.minecraft.world.World;


public class BlockPeripheral extends BlockContainer {

public BlockPeripheral(int blockID, Material blockMaterial) {
  super(blockID, blockMaterial);
}

@Override
  public TileEntity createNewTileEntity(World world) {
  return new TileEntityBlockPeripheral();
}

}
Cool. Now whenever a BlockPeripheral is placed in the world, the createNewTileEntity method is automatically called and we'll be capable of accessing whatever methods our tile entity is given.
Speaking of tile entity methods, allow me to explain the purpose of the tile entities in relation to ComputerCraft. Like I said previously, any block that needs to perform an action each tick is typically a tile entity. Because peripherals often need to perform an action each tick, they are all required to be tile entities. In order to further identify our tile entity as a peripheral, however, we need to make it implement a class in the provided API - in this case, we need it to implement IPeripheral. Go ahead and do this in your TileEntityBlockPeripheral class, allowing Eclipse to autocomplete all your methods for you.
Spoiler
package bubba.cctutorial.tile;

import dan200.computer.api.IComputerAccess;
import dan200.computer.api.IPeripheral;
import net.minecraft.tileentity.TileEntity;

public class TileEntityBlockPeripheral extends TileEntity implements IPeripheral {

@Override
public String getType() {
// TODO Auto-generated method stub
return null;
}

@Override
public String[] getMethodNames() {
// TODO Auto-generated method stub
return null;
}

@Override
public Object[] callMethod(IComputerAccess computer, ILuaContext context,
	int method, Object[] arguments) throws Exception {
// TODO Auto-generated method stub
return null;
}

@Override
public boolean canAttachToSide(int side) {
// TODO Auto-generated method stub
return false;
}

@Override
public void attach(IComputerAccess computer) {
// TODO Auto-generated method stub

}

@Override
public void detach(IComputerAccess computer) {
// TODO Auto-generated method stub

}

}
As you can see, the ComputerCraft API specifies a number of functions we need to have in the class. Let me go through the code and make a few comments about what each function does.
Spoiler
package bubba.cctutorial.tile;

import dan200.computer.api.IComputerAccess;
import dan200.computer.api.IPeripheral;
import net.minecraft.tileentity.TileEntity;

public class TileEntityBlockPeripheral extends TileEntity implements IPeripheral {

@Override
public String getType() {
return null; //When a computer makes a peripheral.getType call, this string is returned
}

@Override
public String[] getMethodNames() {
//This method will serve two purposes:
/* Purpose 1) When a computer makes a peripheral.getMethods call, an unpacked version of the array is returned.
* Purpose 2) When the callMethod method (below) is called, it refers to this method to check which method is to be executed. More on this in a bi
*/
return null;
}

@Override
public Object[] callMethod(IComputerAccess computer, ILuaContext context,
	int method, Object[] arguments) throws Exception {
/* There's a lot of stuff going on in this method, so bear with me.
* IComputerAccess computer: This allows us to perform a few actions with the computer, including but not limited to getting the computer ID and the mount directory
* ILuaContext context: This allows us to do things related to Lua itself. For example, here we can ask the computer to yield or wait until an event is fired.
* int method: int method: This integer is the method that is being called. In getMethodNames, we have a list of methods deliniated by a String array. The index of the called method is this integer (if this doesn't make sense right now, we'll be going over it more in depth in a bit).
* Object[] arguments: This is a list of all the arguments provided when the computer makes a call to this peripheral.
*/
return null;
}

@Override
public boolean canAttachToSide(int side) {
return false; //This one's fairly self explainatory. An integer 0-5 represents a side. Returning a boolean specifies whether we can access the peripheral when it is located on a given side.
}

@Override
public void attach(IComputerAccess computer) {
//Whenever a computer is placed next to the peripheral and turned on (or vice-versa), this method is called
}

@Override
public void detach(IComputerAccess computer) {
//Whenever the peripheral is broken or the computer is removed, this method is called
}

}
Have a read-through of the above comments and things should start to make sense.
Before we go any further though, allow me to skip back to our TutorialInit class for a moment. If you remember, we left that class fairly blank (so far, it only has @Mod and @NetworkMod annotations). We need to actually make sure that we load our new block into the game. Later, we may add other things into this class, but for now let's just keep it basic.
In order to register a block with Minecraft, we're going to interface with a few of the Forge methods made available through the GameRegistry and LanguageRegistry classes. Remember, if you want to get more in-depth with Forge, you can always check out tutorials here.
In order to use this code, we'll need to add in a few methods and mark them for FML to call. We can do this using another annotation.
Spoiler
package bubba.cctutorial;

import cpw.mods.fml.common.Mod;
import cpw.mods.fml.common.event.FMLInitializationEvent;
import cpw.mods.fml.common.network.NetworkMod;

@Mod(modid="bubba.cctutorial")

@NetworkMod(clientSideRequired=true, serverSideRequired=true)

public class TutorialInit {
	@Mod.EventHandler
	public void init(FMLInitializationEvent event) {

	}
}
The @Mod.EventHandler specifies that we are about to make a method that requires calling at some point in the load process. The FMLInitializationEvent argument specifies that we want this method to be called during game initialization. There are three different events that we can put in this method: FMLPreInitializiationEvent, FMLInitializiationEvent, and FMLPostInitializationEvent. A PreInitializationEvent will allow us to get some initial values for our mod. For example, if we add a configuration file to the mod, we would do it during that time. The InitializationEvent is the time to register things with the Forge API - for example, registering a block or item with the game. A PostInitializationEvent allows us to clean things up in our own mod or, more importantly, interface with other mods such as ComputerCraft.
Now before we get too much further, it is important that I add a bit of code to the @Mod annotation from earlier.
Spoiler
package bubba.cctutorial;

import cpw.mods.fml.common.Mod;
import cpw.mods.fml.common.event.FMLInitializationEvent;
import cpw.mods.fml.common.network.NetworkMod;

@Mod(modid="bubba.cctutorial", dependencies="required-after:ComputerCraft;after:CCTurtle")

@NetworkMod(clientSideRequired=true, serverSideRequired=true)

public class TutorialInit {
	@Mod.EventHandler
	public void init(FMLInitializationEvent event) {

	}
}
I've gone ahead and added the dependencies argument to the annotation. The dependencies will specify what mods need to be loaded prior to our mod being loaded. Because our mod interfaces with the ComputerCraft API, we need to make sure that it is not loaded until after ComputerCraft. CCTurtle is a child mod of ComputerCraft, so we need to make sure that it isn't loaded either.
Now we can go ahead and register our peripheral with Forge. Doing so is quite easy:
Spoiler
package bubba.cctutorial;

import bubba.cctutorial.block.BlockPeripheral;
import bubba.cctutorial.tile.TileEntityBlockPeripheral;
import net.minecraft.block.Block;
import net.minecraft.block.material.Material;
import net.minecraft.creativetab.CreativeTabs;
import cpw.mods.fml.common.Mod;
import cpw.mods.fml.common.event.FMLInitializationEvent;
import cpw.mods.fml.common.network.NetworkMod;
import cpw.mods.fml.common.registry.GameRegistry;
import cpw.mods.fml.common.registry.LanguageRegistry;

@Mod(modid="bubba.cctutorial", dependencies="required-after:ComputerCraft;after:CCTurtle")

@NetworkMod(clientSideRequired=true, serverSideRequired=true)

public class TutorialInit {

	Block blockPeripheral = new BlockPeripheral(496,Material.ground);

	@Mod.EventHandler
	public void init(FMLInitializationEvent event) {
		GameRegistry.registerTileEntity(TileEntityBlockPeripheral.class, "blockPeripheralTileEntity.bubba.cctutorial");
		GameRegistry.registerBlock(blockPeripheral, "blockPeripheral.bubba.cctutorial");
		LanguageRegistry.addName(blockPeripheral, "Example Peripheral");
		blockPeripheral.setCreativeTab(CreativeTabs.tabMisc);
	}
}
We've got a few things going on here.
Spoiler
Block blockPeripheral = new BlockPeripheral(496,Material.ground);
Before we do that however, let's register our tile entity with forge.
Spoiler
GameRegistry.registerTileEntity(TileEntityBlockPeripheral.class, "blockPeripheralTileEntity.bubba.cctutorial");
Spoiler
GameRegistry.registerBlock(blockPeripheral, "blockPeripheral.bubba.cctutorial");Spoiler
LanguageRegistry.addName(blockPeripheral, "Example Peripheral");Spoiler
blockPeripheral.setCreativeTab(CreativeTabs.tabMisc);At this point, it should be noted that you have a technically working peripheral. If we were to package the mod up, everything would function as expected. Now it's time to actually make our peripheral do something.
Switch back to our TileEntityBlockPeripheral class. We need to edit the return values of the methods there.
Spoiler
package bubba.cctutorial.tile;

import dan200.computer.api.IComputerAccess;
import dan200.computer.api.IPeripheral;
import net.minecraft.tileentity.TileEntity;

public class TileEntityBlockPeripheral extends TileEntity implements IPeripheral {

	@Override
	public String getType() {
		return "example_peripheral"; //When a computer makes a peripheral.getType call, this string is returned
	}

	@Override
	public String[] getMethodNames() {
		//This method will serve two purposes:
		/* Purpose 1) When a computer makes a peripheral.getMethods call, an unpacked version of the array is returned
		 * Purpose 2) When the callMethod method (below) is called, it refers to this method to check which method is to be executed. More on this in a bi
		 */
		return new String[] {"method1", "method2"}; //Give us a few methods to mess around with
	}

	@Override
	public Object[] callMethod(IComputerAccess computer, ILuaContext context,
			int method, Object[] arguments) throws Exception {
		/* There's a lot of stuff going on in this method, so bear with me.
		 * IComputerAccess computer: This allows us to perform a few actions with the computer, including but not limited to getting the computer ID and the mount directory
		 * ILuaContext context: This allows us to do things related to Lua itself. For example, here we can ask the computer to yield or wait until an event is fired.
		 * int method: int method: This integer is the method that is being called. In getMethodNames, we have a list of methods deliniated by a String array. The index of the called method is this integer (if this doesn't make sense right now, we'll be going over it more in depth in a bit).
		 * Object[] arguments: This is a list of all the arguments provided when the computer makes a call to this peripheral.
		 */

		return null; //We'll mess with this in a moment
	}

	@Override
	public boolean canAttachToSide(int side) {
		//This one's fairly self explanatory. An integer 0-5 represents a side. Returning a boolean specifies whether we can access the peripheral when it is located on a given side.
		return true; //Make sure you change this to true or you won't be able to attach to the peripheral!
	}

	@Override
	public void attach(IComputerAccess computer) {
		//Whenever a computer is placed next to the peripheral and turned on (or vice-versa), this method is called
		//We'll leave this blank for now.
	}

	@Override
	public void detach(IComputerAccess computer) {
		//Whenever the peripheral is broken or the computer is removed, this method is called
		//We'll leave this blank for now
	}

}
As you can see, I've changed the return values of getType, getMethodNames, and canAttachToSide. These are fairly self-explanatory, so let's move on to callMethod.
Allow me to imagine a scenario for you. We have a computer placed next to a peripheral, and use peripheral.call("right", "method1") to attempt to call the java code. ComputerCraft will go to our tile entity and inform it that it needs the method executed. It does this through the callMethod method.
When it calls this method, it will provide it with a number of arguments. In this case, they are as follows:
IComputerAccess, 0, Object[] {}
Note the 0. The 0 specifies that we are calling method1, because that is the index of the requested method. If we were to use peripheral.call("right", "method1"), this would be a 1.
I typically use a switch statement to perform the proper requested code, so let's go ahead and do that.
Spoiler
package bubba.cctutorial.tile;

import dan200.computer.api.IComputerAccess;
import dan200.computer.api.IPeripheral;
import net.minecraft.tileentity.TileEntity;

public class TileEntityBlockPeripheral extends TileEntity implements IPeripheral {

	@Override
	public String getType() {
		return "example_peripheral"; //When a computer makes a peripheral.getType call, this string is returned
	}

	@Override
	public String[] getMethodNames() {
		//This method will serve two purposes:
		/* Purpose 1) When a computer makes a peripheral.getMethods call, an unpacked version of the array is returned
		 * Purpose 2) When the callMethod method (below) is called, it refers to this method to check which method is to be executed. More on this in a bi
		 */
		return new String[] {"method1", "method2"}; //Give us a few methods to mess around with
	}

	@Override
	public Object[] callMethod(IComputerAccess computer, int method,
			Object[] arguments) throws Exception {
		/* There's a lot of stuff going on in this method, so bear with me.
		 * IComputerAccess computer: This allows us to perform a few actions with the computer, including but not limited to getting the computer ID and the mount directory
		 * ILuaContext context: This allows us to do things related to Lua itself. For example, here we can ask the computer to yield or wait until an event is fired.
		 * int method: int method: This integer is the method that is being called. In getMethodNames, we have a list of methods deliniated by a String array. The index of the called method is this integer (if this doesn't make sense right now, we'll be going over it more in depth in a bit).
		 * Object[] arguments: This is a list of all the arguments provided when the computer makes a call to this peripheral.
		 */

		switch(method) {
		case 0:
			return new Object[] {"You just called method1!"};
		case 1:
			return new Object[] {"You just called method2!"};
		default: //Make sure you have this in case they attempt to call a method that we don't handle.
			return new Object[] {"That method does not exist!"};
		}
	}

	@Override
	public boolean canAttachToSide(int side) {
		//This one's fairly self explanatory. An integer 0-5 represents a side. Returning a boolean specifies whether we can access the peripheral when it is located on a given side.
		return true; //Make sure you change this to true or you won't be able to attach to the peripheral!
	}

	@Override
	public void attach(IComputerAccess computer) {
		//Whenever a computer is placed next to the peripheral and turned on (or vice-versa), this method is called
		//We'll leave this blank for now.
	}

	@Override
	public void detach(IComputerAccess computer) {
		//Whenever the peripheral is broken or the computer is removed, this method is called
		//We'll leave this blank for now
	}

}
Now when we execute peripheral.call("right", "method1"), we will get a return value: "You just called method1!".
Now you can get excited. You've made a mod that allows us to make calls to java code. All that is left is to clean a few things up and package it into a mod.
There are several things you should take note of before I finish up. This mod is giving you the extreme basics. I have not shown you how to add textures to your block, register a turtle peripheral (we'll see about future tutorials), or add a mod configuration. You will need to figure this stuff out on your own. Keep in mind the forge tutorial set to get up to date examples on how to make this stuff.
Now, let's finish things up. First, I'd like to point out that most peripherals interact with the Minecraft world in some way. In order for us to do this, we will need access to an instance of the world. Fortunately, this is only a matter of making a constructor to the tile entity class and providing it with the proper argument in the createNewTileEntity method.
BlockPeripheral.class
Spoiler
package bubba.cctutorial.block;

import bubba.cctutorial.tile.TileEntityBlockPeripheral;
import net.minecraft.block.BlockContainer;
import net.minecraft.block.material.Material;
import net.minecraft.tileentity.TileEntity;
import net.minecraft.world.World;


public class BlockPeripheral extends BlockContainer {

	public BlockPeripheral(int blockID, Material blockMaterial) {
		super(blockID, blockMaterial);
	}

	@Override
	public TileEntity createNewTileEntity(World world) {
		return new TileEntityBlockPeripheral(world);
	}

}
TileEntityBlockPeripheral.class
Spoiler
package bubba.cctutorial.tile;

import dan200.computer.api.IComputerAccess;
import dan200.computer.api.ILuaContext;
import dan200.computer.api.IPeripheral;
import net.minecraft.tileentity.TileEntity;
import net.minecraft.world.World;

public class TileEntityBlockPeripheral extends TileEntity implements IPeripheral {

	private World world;

	public TileEntityBlockPeripheral(World world) {
		this.world = world;
	}

	@Override
	public String getType() {
		return "example_peripheral"; //When a computer makes a peripheral.getType call, this string is returned
	}

	@Override
	public String[] getMethodNames() {
		//This method will serve two purposes:
		/* Purpose 1) When a computer makes a peripheral.getMethods call, an unpacked version of the array is returned
		 * Purpose 2) When the callMethod method (below) is called, it refers to this method to check which method is to be executed. More on this in a bi
		 */
		return new String[] {"method1", "method2"}; //Give us a few methods to mess around with
	}

	@Override
	public Object[] callMethod(IComputerAccess computer, ILuaContext context,
			int method, Object[] arguments) throws Exception {
		/* There's a lot of stuff going on in this method, so bear with me.
		 * IComputerAccess computer: This allows us to perform a few actions with the computer, including but not limited to getting the computer ID and the mount directory
		 * ILuaContext context: This allows us to do things related to Lua itself. For example, here we can ask the computer to yield or wait until an event is fired.
		 * int method: int method: This integer is the method that is being called. In getMethodNames, we have a list of methods deliniated by a String array. The index of the called method is this integer (if this doesn't make sense right now, we'll be going over it more in depth in a bit).
		 * Object[] arguments: This is a list of all the arguments provided when the computer makes a call to this peripheral.
		 */
		switch(method){
		case 0:
			return new Object[] {"You called method1!"};
		case 1:
			return new Object[] {"You called method2"};
		default:
			return new Object[] {"Invalid method alert"};
		}

	}

	@Override
	public boolean canAttachToSide(int side) {
		//This one's fairly self explanatory. An integer 0-5 represents a side. Returning a boolean specifies whether we can access the peripheral when it is located on a given side.
		return true; //Make sure you change this to true or you won't be able to attach to the peripheral!
	}

	@Override
	public void attach(IComputerAccess computer) {
		//Whenever a computer is placed next to the peripheral and turned on (or vice-versa), this method is called
		//We'll leave this blank for now.
	}

	@Override
	public void detach(IComputerAccess computer) {
		//Whenever the peripheral is broken or the computer is removed, this method is called
		//We'll leave this blank for now
	}

}
Peruse World.class to figure out what sort of things you're given access to there.
The last thing I'm going to show you how to do is use the arguments provided to you by ComputerCraft code.
There are three types of arguments a computer can provide to you - integers, doubles, booleans, and strings. These are all passed in as Objects, which is an important distinction to make because we will need to cast them to their proper type before we're able to use them. To example this, let me make a method that echos back whatever you say with a little addition.
Spoiler
package bubba.cctutorial.tile;

import dan200.computer.api.IComputerAccess;
import dan200.computer.api.ILuaContext;
import dan200.computer.api.IPeripheral;
import net.minecraft.server.MinecraftServer;
import net.minecraft.tileentity.TileEntity;
import net.minecraft.world.World;

public class TileEntityBlockPeripheral extends TileEntity implements IPeripheral {

        private World world;

        public TileEntityBlockPeripheral(World world) {
                this.world = world;
        }

        @Override
        public String getType() {
                return "example_peripheral"; //When a computer makes a peripheral.getType call, this string is returned
        }

        @Override
        public String[] getMethodNames() {
                //This method will serve two purposes:
                /* Purpose 1) When a computer makes a peripheral.getMethods call, an unpacked version of the array is returned
                 * Purpose 2) When the callMethod method (below) is called, it refers to this method to check which method is to be executed. More on this in a bi
                 */
                return new String[] {"method1", "method2", "echo"}; //Give us a few methods to mess around with
        }

        @Override
        public Object[] callMethod(IComputerAccess computer, ILuaContext context,
                        int method, Object[] arguments) throws Exception {
                /* There's a lot of stuff going on in this method, so bear with me.
                 * IComputerAccess computer: This allows us to perform a few actions with the computer, including but not limited to getting the computer ID and the mount directory
                 * ILuaContext context: This allows us to do things related to Lua itself. For example, here we can ask the computer to yield or wait until an event is fired.
                 * int method: int method: This integer is the method that is being called. In getMethodNames, we have a list of methods deliniated by a String array. The index of the called method is this integer (if this doesn't make sense right now, we'll be going over it more in depth in a bit).
                 * Object[] arguments: This is a list of all the arguments provided when the computer makes a call to this peripheral.
                 */

                switch(method){
                case 0:
                        return new Object[] {"You called method1!"};
                case 1:
                        return new Object[] {"You called method2"};

                case 2: { //This is our echo method
                        Object[] returnObject = new Object[10]; //Note that this method supports only up to 10 arguments
                        for (int k=0; k<arguments.length; k++)="" {="" returnobject[k]="You said: " +="" ((string)="" arguments[k]);="" }="" return="" returnobject;="" default:="" new="" object[]="" {"invalid="" method="" alert"};="" @override="" public="" boolean="" canattachtoside(int="" side)="" this="" one's="" fairly="" self="" explanatory.="" an="" integer="" 0-5="" represents="" a="" side.="" returning="" specifies="" whether="" we="" can="" access="" the="" peripheral="" when="" it="" is="" located="" on="" given="" true;="" make="" sure="" you="" change="" to="" true="" or="" won't="" be="" able="" attach="" peripheral!="" void="" attach(icomputeraccess="" computer)="" whenever="" computer="" placed="" next="" and="" turned="" (or="" vice-versa),="" called="" we'll="" leave="" blank="" for="" now.="" detach(icomputeraccess="" broken="" removed,="" now="" [="" code][="" spoiler]="" as="" see,="" i've="" added="" another="" method.="" will="" go="" through="" array="" of="" arguments="" "you="" said:="" "="" each="" one.="" i="" have="" explicity="" cast="" string="" purposes="" tutorial.="" with="" that,="" we're="" done!="" let's="" package="" our="" mod="" up="" loading="" in="" minecraft="" environment.="" do="" this,="" back="" forge="" mcp="" folder="" find="" files="" entitled="" "recompile.bat"="" "reobfuscate.bat".="" run="" both="" those.="" they="" generate="" few="" folder.="" once="" they've="" finished,="" navigate="" reobf="" minecraft.="" here="" two="" folders:="" bubba="" dan200.="" ignore="" dan200="" -="" that's="" api="" code="" provided="" by="" computercraft,="" don't="" want="" that="" mod.="" what="" zip="" containing="" your="" obfuscated="" code.="" windows,="" simple="" right="" clicking="" 'bubba'="" selecting="" "send="" to-="">Compressed (Zipped) Folder". The output will be a folder called bubba.zip, which is our completed mod. Drop this into your mods folder to load it up.


Here's a few pictures of the mod loaded into Minecraft.
[img]http://i.imgur.com/l75fMk5.png[/img]
[img]http://i.imgur.com/A19Vasl.png[/img]

Admittedly, the peripheral is quite ugly without textures. Fortunately, they aren't too difficult to create. Go ahead and check out the Forge tutorials to see how to go about that.

[center][size=5][b]Helpful links[/b][/size][/center]
The full code for all of this tutorial: [url=https://github.com/AliquotMesozoic/PeripheralTutorial]GitHub[/url] [url=https://docs.google.com/file/d/0B3PVmwIq0AtwU0FPRTNnY3lyOG8/edit?usp=sharing]Google Drive[/url]
Obfuscated version of the mod: [url=https://docs.google.com/file/d/0B3PVmwIq0AtwMVNPeW1QQWEzVWM/edit?usp=sharing]Google Drive[/url]
Minecraft Forge tutorials: [url=http://www.minecraftforge.net/wiki/Tutorials]Forge Wiki[/url]
ComputerCraft Download: [url=http://www.computercraft.info/download/]ComputerCraft homepage[/url]


