Posted 08 February 2014 - 07:17 PM
The Complete Monitor Buttons and Control Tutorial
Part II – Monitor Buttons
This is a the second part of a four-part tutorial series on touch screen monitor buttons and controls. The first part covered Monitor Basics and should have been completed before beginning this part. Many of the example concepts spill over into this part.
Credits
- Tutorial and Code Samples: [member="surferpup"]
- Editing and Proof Reading: [member="awsmazinggenius"] and [member="ingie"]
We have quite a bit to cover in this second part: we will be exploring the techniques behind creating and displaying buttons on our monitors and using those techniques to create a full button solution. But before we get started, please make sure your world setup is similar to the previous part of this series:
World Setup
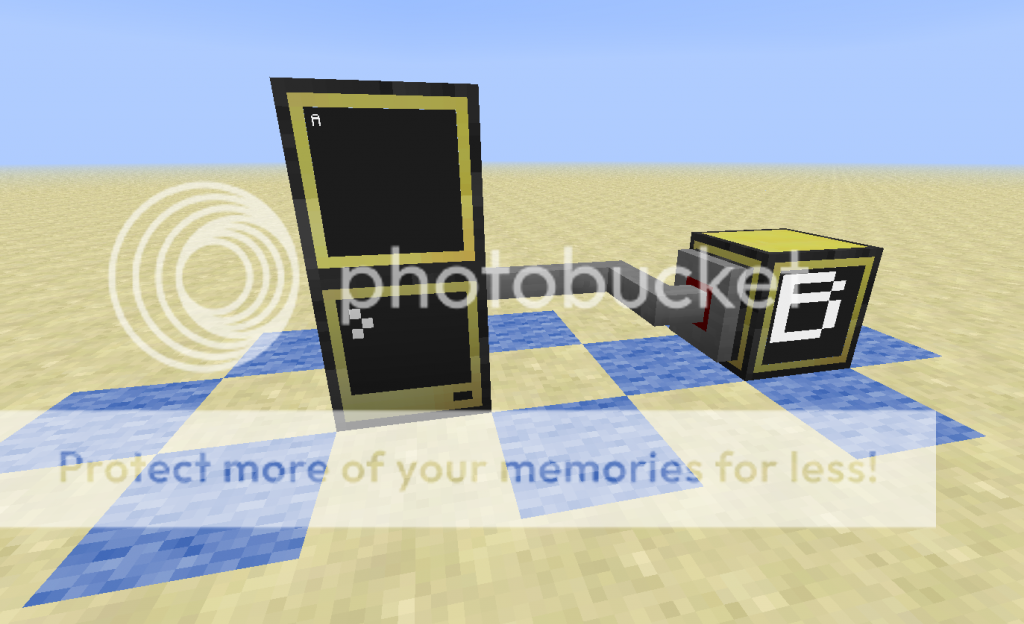
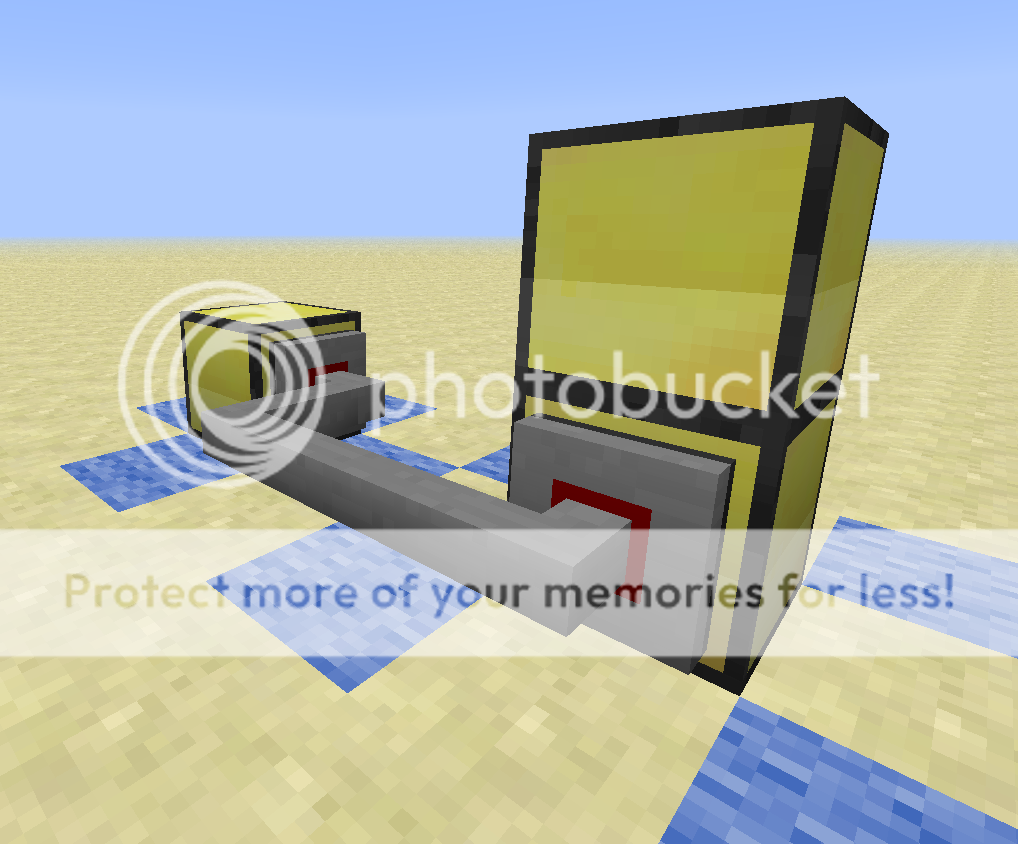
Now days we have smartphones with maps and GPS. This part of the tutorial is necessarily long, and while we will try to place waypoints and signs along the road, it would probably be best to give you a little bit of a route overview. By traveling though this tutorial and working with the code as it evolves, you will gain understanding of all aspects of our final button object (and probably pick up a better understanding of Lua along the way).
Overview
We begin with a discussion of buttons and wind our way to a complete programmatic solution to creating and displaying buttons. The first several miles of our journey take us through manually creating and using each feature of our button. We will be creating variables that are essential for a button and the code to implement each feature of our button. Our code becomes unwieldy when we have added most of the features, so we take a trip through turning our button drawing code into a function. From there we discover that we could have taken a shorter route if we had only packed a table and a couple extra Lua concepts. We stop to pick these concepts up and change course. We then find an expressway by creating a Lua closure object, and we speed to our final destination – a complete button object which can be used in any of our future code projects. If any of these topics seem unfamiliar to you, all of the code and an explanation of the code is provided.
Glossary of Variables
The following are a list of variables and the button aspect they are associated with:- attachedMonitor: during our manual button creation, this is the display device we use for the button
- backgroundColorNormal: the background color when the button is normal (not pressed)
- backgroundColorPressed the background color when the button is pressed
- borderColorNormal: if there is a border, the border color when the button is normal (not pressed)
- borderColorPressed: if there is a border, the border color when the button is pressed
- button: a table variable local to the final functions which stores all of the fields of our button
- defaultBackgroundColor: the background color to reset the display to when exiting our draw function
- defaultTextColor: the text color to reset the display to when exiting our draw function
- display: in our button object, the display device upon which we want to display the button
- hasBorder: a boolean which controls whether a border will be drawn within the button bounds
- height: how many rows tall the button needs for display
- isPressed: a boolean which controls whether the button will display as pressed (true) or normal (false)
- label: the label that displays on the button
- labelPad: a variable local to the draw function which determines whether the button label will be drawn with or without spacial separation from the button margin
- startColumn: the left most column position of the displayed button
- startRow: the top most row position of the displayed button
- textColorNormal: the text color of the label text when the button is normal (not pressed)
- textColorPressed: the text color of the label text when the button is pressed
- width: how many columns wide the button needs for display
Getting Started
Let's think about what kinds of things we want to do when we say we are going to create a button on a monitor. Obviously, we need to attach a monitor to our computer and obtain a handle for the monitor using peripheral.wrap as we did previously. But we also need to think about the logic behind what we are trying to accomplish.
Think about how in general we have gone about getting the user's attention. Without a button, we usually display something at the bottom of the screen like ("Press any key to continue …)". Here, we are trying to instruct a user on how they can move the program along to its next operation.
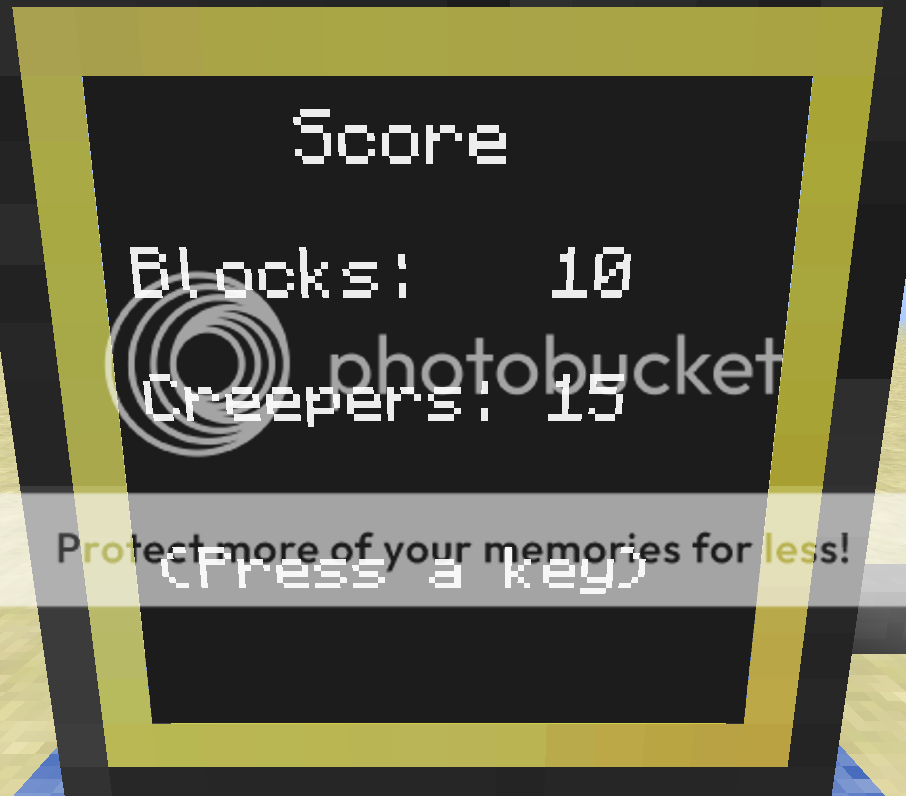
Like the informational text message, a button is just an area on our monitor screen that sets itself apart from other areas displayed on the screen. However, with a button, we are creating a graphic of sorts that draws attention to istelf and invites user action. Given the conditioning users have to graphical user interfaces, the typical user knows that the button is something that they can click on and something will happen if they do. We alert the user to what action will occur typically by displaying some sort of label on the button. Consider a typical informational sceen with an OK button to continue.
In such a screen, there may be messages, status information or whatever – but the user knows from experience that if they click on the highlighted area that has OK centered in the area, the program will probably erase the current display and display something else.
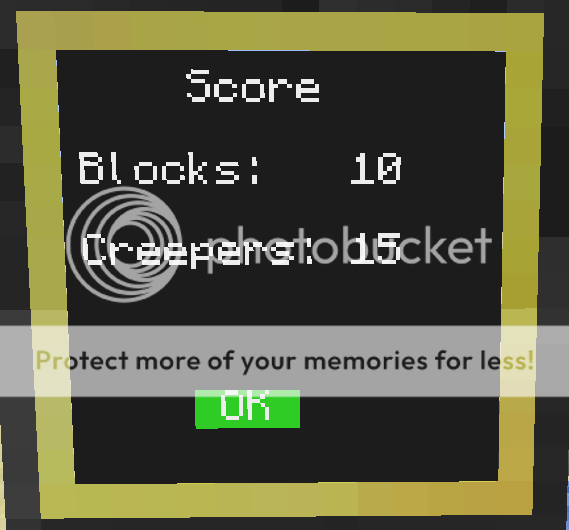
So, when we think about creating typical buttons, we need to be able to accomplish the following:
- Display a rectangular area on the monitor which has a background color different from surrounding areas. This would be our button.
- In a color different from the background color of the button, display some text centered that informs what the button is for. This would be the label.
- Know where the upper left coordinates of the button are and where the lower right coordinates are for the button area. These would be our bounds for the button – the area the user will click.
- Display a different background and text color if the user has clicked in the bounds area. These would be our button pressed colors.
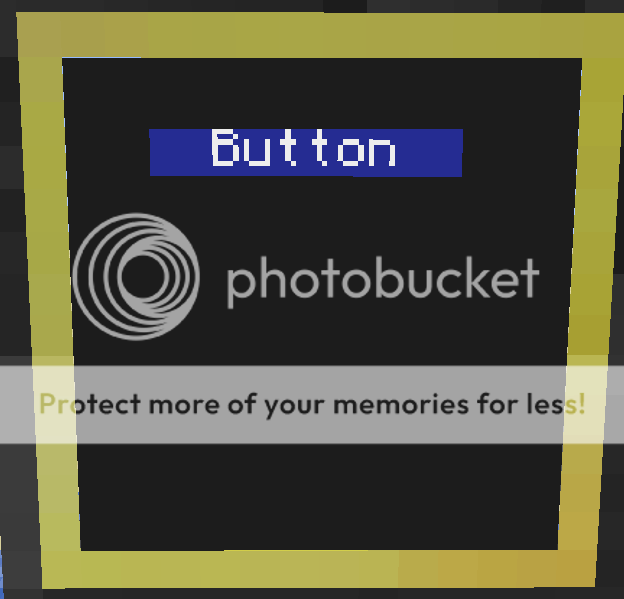
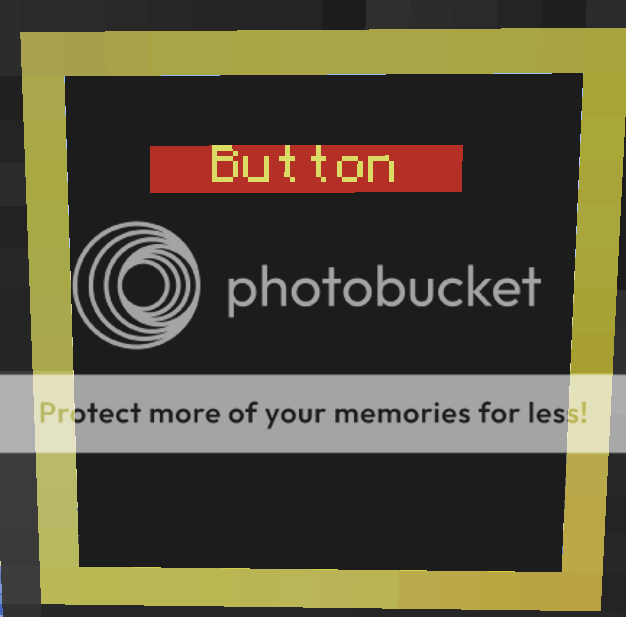
Lets start by making the most rudimentary of buttons: some highlighted text. We are going to make a button that is 10 columns wide. We'll use "Button" as our label. We'll place our first button at column 3 row 2 of the monitor. We want the normal version of the button to be white text on a blue background, and the "pressed" version to be yellow text on a red background. We want our label centered within the button bounds. We know that the button is 10 wide and that the word "Button" is 6 wide. That means if we want the label centered (and we do), we will have to write our label two columns into our button.
-- set up monitor
attachedMonitor = peripheral.wrap("top")
attachedMonitor.setBackgroundColor(colors.black)
attachedMonitor.setTextColor(colors.white)
attachedMonitor.setTextScale(.5)
attachedMonitor.clear()

-- Display the button
attachedMonitor.setBackgroundColor(colors.blue)
attachedMonitor.setCursorPos(3,2)
attachedMonitor.write(string.rep(" ",10)) -- 10 spaces

--Display the label
attachedMonitor.setTextColor (colors.white)
attachedMonitor.setCursorPos(3+2,2) -- remember 2 columns more for centering here
attachedMonitor.write("Button")

-- reset to original text/background colors
attachedMonitor.setBackgroundColor(colors.black)
attachedMonitor.setTextColor(colors.white)

-- sleep and then let's do it again with our "pressed" colors.
sleep(3)

attachedMonitor.setBackgroundColor(colors.red)
attachedMonitor.setCursorPos(3,2)
attachedMonitor.write(string.rep(" ",10))
attachedMonitor.setTextColor(colors.yellow)
attachedMonitor.setCursorPos(5,2)
attachedMonitor.write("Button")

-- reset to original text/background colors
attachedMonitor.setBackgroundColor(colors.black)
attachedMonitor.setTextColor(colors.white)

-- indicate done
attachedMonitor.setCursorPos(1,5)
AttachedMonitor.write("Done.")
If you got all the code entered correctly, your program should look like the following screenshots:
Centering the Label Across the Button Width
But what if we want a different label? Do we have to do all of the centering calculations manually each time? Of course not. We want a simple way of centering the label in the width of the button. We already know the width of the button – we had to know that to make things fit on our screens. We know the width of the label, too, no matter what it is by just using the #"Button" operand – which will give us the length of any string. So we can use that to our advantage.
There is empty space on our button that is unused by the label text. We want to distribute this empy space so half of it is before the label, and half after the label – that way it will be centered. We can calculate half of the empty space. That's easy – it is:
(width - #label)/2
If we position our cursor so that the label displays immediately following this leading half of the empty space, our label will be centered. Since the setCursorPos prefers integers, we will use the math.floor function to round down any remainders.
We will replace:
attachedMonitor.setCursorPos(3+2,2) -- the added 2 columns are for centering herewith
attachedMonitor.setCursorPos(3 + math.floor((10 - #"Button")/2),2) Creating a Few Variables
There's a lot in our current code that would need to be changed every time we changed the text of the label or the size or location of the button. In fact, our code up until now has a whole bunch of hard-coded values that would be better off as variables. Variables make coding much easier to read and easier to change. Looking through the code as it exists, it is east to spot them:
- the default background and text colors
- the normal background color of the button
- the normal text color of the label
- the pressed background color of the button
- the pressed text color of the button
- the starting location of the button (row,column)
- the width of the button
First, we'll create a section for our important variables, giving us one place in the code to change the monitor, the colors, the width, the starting location and the label.
local attachedMonitor = peripheral.wrap("top")
local defaultBackgroundColor =colors.black
local defaultTextColor=colors.white

local backgroundColorNormal = colors.blue
local backgroundColorPressed = colors.red

local textColorNormal = colors.white
local textColorPressed = colors.yellow

local width=10
local label="button"

local startColumn=3
local startRow=3
Next, we'll add the executeable portion of our code, with our new centering technique:
-- Set up Monitor
attachedMonitor.setBackgroundColor(defaultBackgroundColor)
attachedMonitor.setTextColor(defaultTextColor)
attachedMonitor.setTextScale(.5)
attachedMonitor.clear()

-- Display the button Background
attachedMonitor.setBackgroundColor(backgroundColorNormal)
attachedMonitor.setCursorPos(startRow,startColumn)
attachedMonitor.write(string.rep(" ",width))

--Display the label (auto centered)
attachedMonitor.setTextColor (textColorNormal)
attachedMonitor.setCursorPos(startColumn + math.floor((width - #label)/2),startRow)
attachedMonitor.write(label)

-- reset to original text/background colors
attachedMonitor.setBackgroundColor(defaultBackgroundColor)
attachedMonitor.setTextColor(defaultTextColor)

-- sleep and then let's do it again with our "pressed" colors.
sleep(3)

attachedMonitor.setBackgroundColor(backgroundColorPressed)
attachedMonitor.setCursorPos(startRow,startColumn)
attachedMonitor.write(string.rep(" ",width))
attachedMonitor.setTextColor(textColorPressed)
attachedMonitor.setCursorPos(startColumn + math.floor((width - #label)/2),startRow)
attachedMonitor.write(label)

attachedMonitor.setBackgroundColor(defaultBackgroundColor)
attachedMonitor.setTextColor(defaultTextColor)
attachedMonitor.setCursorPos(1,5)
attachedMonitor.write("Done.")
print()
You can download the code as now changed on pastebin (Pastebin Code: rthtS75f).
Setting the Button Height
We now can set the pressed and normal colors for our button, the button width, the label and the location to display the button. But what about the button height? We may not alßways want a single-line button. Button height is very straight forward, as all we need to do is repeat the display of our button background for each row of button height. To do that, we simply create a new variable height, and iterate over height when we display the button background:
local height = 3 -- add this to our variables

-- Display the button Background
attachedMonitor.setBackgroundColor(backgroundColorNormal)
for row = startRow,startRow+height-1 do
	attachedMonitor.setCursorPos(startColumn,row)
	attachedMonitor.write(string.rep(" ",width))
end
Current Code
The current code can be dowloaded using the Pastebin code: pGa47JpkCentering the Label Along the Height
When we run our current code with the button height set to 3, we notice that the button label prints on the top line of the button.
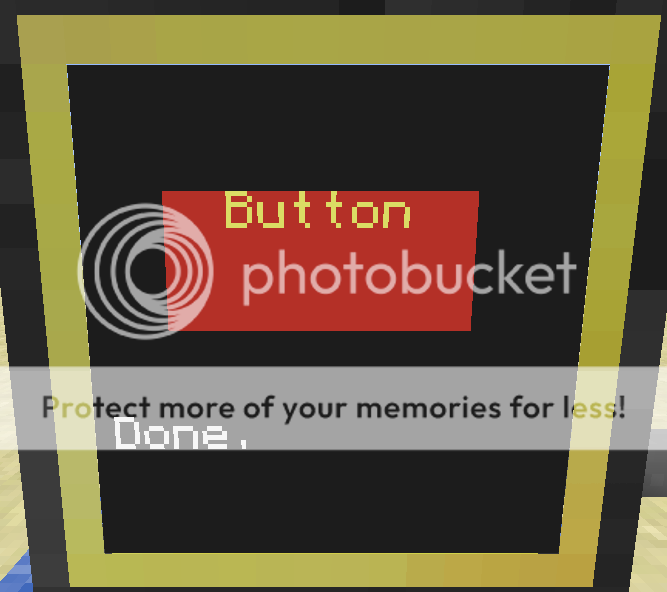
But we want our button label to center between the top and bottom rows. We already center our label horizontally on the row it displays. If we can get our label to print on the center row, we should be good. To do that, we will modify the label print portion of the code and this time adjust the row. We want it to display on the row that is 1/2 of the button height, but as before, we need an integer so we will use the math.floor function. Change the line that displays the label as follows.
attachedMonitor.setCursorPos(startColumn + math.floor((width - #label)/2),startRow + math.floor(height/2))

Now our buutton label is centered horizontally and vertically in the button. But what happens if we change the height? Change the height to 2 and see how the button displays.

You should notice that our button printed on the second line. Is that the behavior you want? We can change that by simply modifying our funtion to print, creating the rule for ourselves that if the height is even, we resolve the center up a row. Here is our completed label display code with this in mind:
attachedMonitor.setCursorPos(startColumn + math.floor((width - #label)/2),startRow + math.floor((height-1)/2))
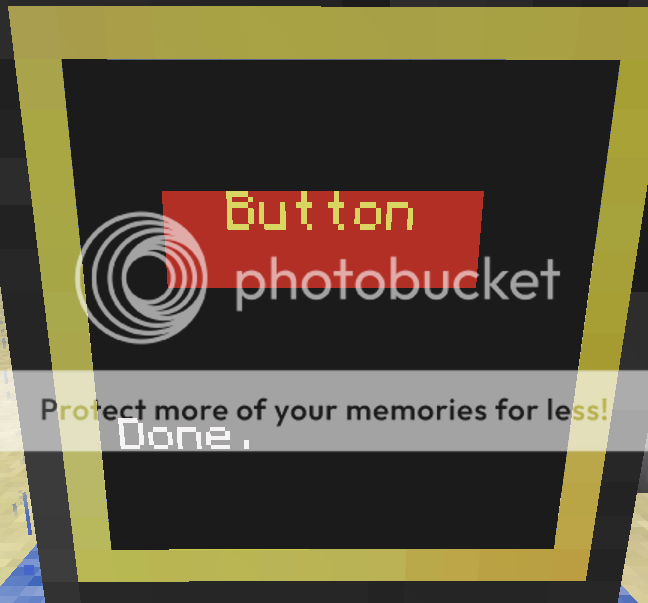
Now our label is centered and positioned the way we want.
Dealing with Corner Cases
What happens if the label is wider than the button width? What happens if our label prints off our screen? As we add to our button example, we will have to deal with all sorts of these questions. They are called corner cases. We already fixed a corner case when we decided to center the label vertically and we chose to center one line up when we had an even number of rows. Currently, if our label is wider than the button, our code displays as follows (we're using a 10 x 3 button with a label of "Big Big Big Button"):
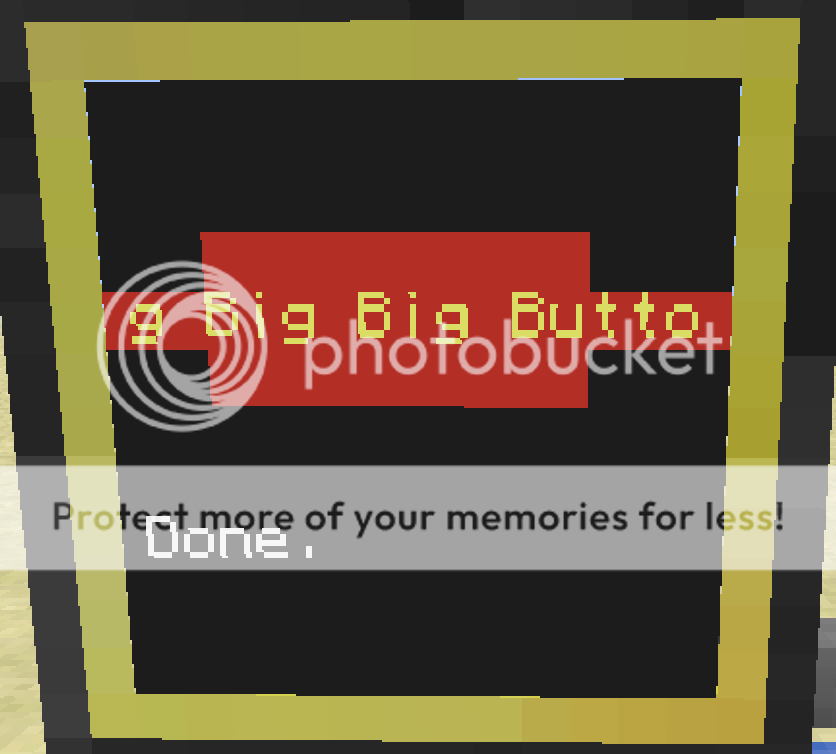
Wow. We should probably fix that. We should have a rule that if the label is wider than the button, we trunctate the label. This makes sense, because we can think of our button as a container, and we don't want our label to spill out of the container. We can think up other corner cases if we try. What if two labels are printed side by side and the label widths are equal to the button widths? The labels would appear to run together, wouldn't they? We probably always want at least 1 space to the right and left of the label to prevent label texts from running into each other. What happens if our button is so small we don't have room for any padding on the label? We'll have to think about that. As for printing off the screen, we may want to handle that ourselves, making sure we don't create a button that will print larger than our monitor. These are all corner cases, and we will deal with each one except for the case when the button is larger than the monitor (we just won't print them off the screen, right?).
Corner Case One – Label Width Larger than Button Width
We saw what happens when our label width is larger than our button width. To fix that, let's create a rule that we truncate our label when it is larger than the button width. We will add the following code to handle that before we display our label.
if #label > width then
  label = label:sub(1,width)
end
We used the string.sub function to truncate the label string. That wasn't too bad to fix. Now on to label padding.
Corner Case Two – Add Label Padding
To prevent label texts from running into each other, we simply want to make sure that our label width is small enough to allow a space before and after it and still fit within the width of the button. We can do that by making sure that our label is trunctated when it is wider than our button width minus two for our padding.
local labelPad = 2 -- add this to the variables section

if #label > width - labelPad then
  label = label:sub(1,width - labelPad)
end
Corner Case Three – Width Doesn't Allow for Label Padding
By adding label padding, we created another problem – what if the button is so small we don't have room for label padding? This would occur when the button width is less than three wide. Since we set our labelPad to 2 in our variables section, all we need to do is reset it to zero when the width of the label is less than 3.
if width < 3 then
  labelPad = 0
end
This will still allow at least one character of the label to print on a very small button.
Corner Case Four – Display is not a Color Display
Hmm. That is tricky, isn't it? If the display is not color, yet we try and use color, we will get an error. To avoid this, we need to code for the possibility that the display is not color. We can assume that if the display is black and white, the button background will be black for not pressed, and white for pressed. Since we only have two colors (black or white), we will make the label text color the opposite of whatever the background color is.
We currently change colors in three scenarios in our code:
- When we revert to default background and text colors
- When we display the button
- When we display the label
The simplest and most direct way to avoid color errors is to test for color every time we decide to change color. We will use an "if not display.isColor()" test beofre each color change. For the default colors, we can use the following if … else control block:
if not attachedMonitor.isColor() then
	attachedMonitor.setBackgroundColor(colors.black)
	attachedMonitor.setTextColor(colors.white)
else
	attachedMonitor.setBackgroundColor(defaultBackgroundColor)
	attachedMonitor.setTextColor(defaultTextColor)
end
Similarly, for the button/label colors, the code would be:
-- set the button/label color to normal (not pressed) colors
if not attachedMonitor.isColor() then
	attachedMonitor.setBackgroundColor(colors.black)
	attachedMonitor.setTextColor(colors.white)
else
	attachedMonitor.setBackgroundColor(backgroundColorNormal)
	attachedMonitor.setTextColor(textColorNormal)
end
When we repeat for the pressed version, obviously we need to substitue in pressed colors. We need to do something similar each time we change the color, and that should do it. Reorganized a bit, and with the corner cases we have solved, our code thus far can be downloaded using Pastebin Code: qqAaix4K
Consolidating Our Code – The draw Function
Let's take a moment and look where we are. We created code that manaully sets up the characteristics of our button and draws it on the display device. We have grown our code from just a simple highlighted text button to where we deal with width, height, centering the label and dealing with corner cases. We can display our code in different colors for pressed and normal (not pressed) versions – although we have to repeat our code each time we want to display our button differently.
That makes the code a good candidate for consolidation. We currently write the same code twice – once for the normal (not pressed) version of the button, and once for the pressed version, Before we look into the last corner case (more on that in a bit), let's think of consolidating what we have written.
We essentailly have three sections of code – the variable declarations, a section which displays the normal (not pressed) button, and a section which displays the pressed version of the code. The only thing which differs between the normal and pressed sections is the setting of the button/text colors. This sounds ripe for a function.
Let's make a draw function to display the normal (not pressed) button. We'll use the local variables already defined in the code and just deal with the logic for now. Looking through the code, our draw function needs to do the following:
- Set the button/label color to normal (not pressed) colors
- Display the button Background
- Prepare label, truncate label if necessary
- Display the label (auto centered)
- Reset the display to default colors
local function draw()
	-- set the button/label color to normal (not pressed) colors
	if not attachedMonitor.isColor() then
		attachedMonitor.setBackgroundColor(colors.black)
		attachedMonitor.setTextColor(colors.white)
	else
		attachedMonitor.setBackgroundColor(backgroundColorNormal)
		attachedMonitor.setTextColor(textColorNormal)
	end
	-- Display the button Background
	for row = startRow,startRow+height-1 do
		attachedMonitor.setCursorPos(startColumn,row)
		attachedMonitor.write(string.rep(" ",width))
	end

	-- prepare label, truncate label if necessary
	if width < 3 then
		labelPad = 0
	end
	if #label > width - labelPad then
		label = label:sub(1,width - labelPad)
	end

	--Display the label (auto centered)
	attachedMonitor.setCursorPos(startColumn + math.floor((width - #label)/2),startRow + math.floor((height-1)/2))
	attachedMonitor.write(label)

	-- reset to original text/background colors
	if not attachedMonitor.isColor() then
		attachedMonitor.setBackgroundColor(colors.black)
		attachedMonitor.setTextColor(colors.white)
	else
		attachedMonitor.setBackgroundColor(defaultBackgroundColor)
		attachedMonitor.setTextColor(defaultTextColor)
	end
end
The only thing we are missing here is a way to change colors if the button is normal or pressed. If the button is not pressed, we will need to set the button/label colors to the normal colors, otherwise, we need to set the button/label colors to the pressed colors. So, we need an if … else control block where we set the colors. We will just copy in the actions for both the pressed and normal color changes:
	if not isPressed then
		if not display.isColor() then
			display.setBackgroundColor(colors.black)
			display.setTextColor(colors.white)
		else
			display.setBackgroundColor(button.backgroundColorNormal)
			display.setTextColor(button.textColorNormal)
		end
	else
		if not display.isColor() then
			display.setBackgroundColor(colors.white)
			display.setTextColor(colors.black)
		else
			display.setBackgroundColor(button.backgroundColorPressed)
			display.setTextColor(button.textColorPressed)
		end
	end
To finish implementing this, we need to change our function declaration to pass in the isPressed argument, and we will have to deal with nil values (values not supplied in the function call). It is always a good idea to handle nil arguments in functions so that you maintain control over what happens in your code. Normally, we can deal with nil arguments by simply using an or in the assignment,like this:
isPressed = isPressed = isPressed or falseThis works because nil values always evaluate to a logical false. So if isPressed is set (it holds a true or false or any other value), we will keep it. If it is not set, we will assume it to be false.
We'll change our function call and default for isPressed to complete our consolidated code. To check your work, here is the Pastebin code for the consolidated code: S0ZXfj7n.
You will find that organizing our code the way we did made it much cleaner and far more useful. However, we mentioned earlier that there was a final corner case we needed to consider. Take a look at what happens if we print four buttons in black and white (in alternating states to make a point).
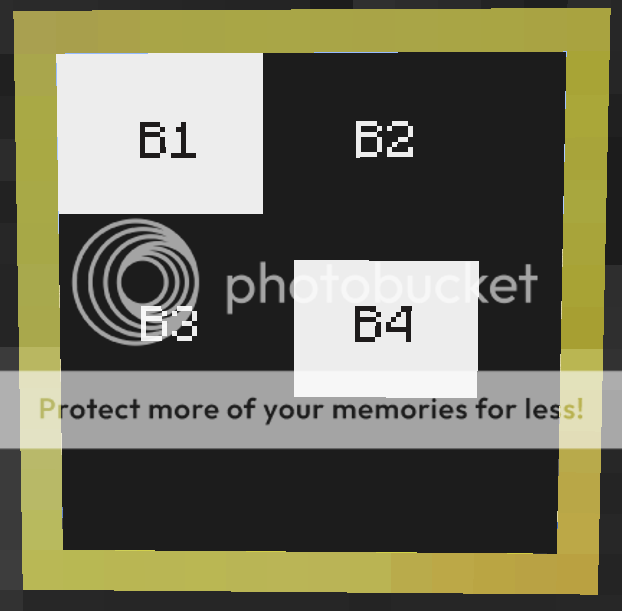
What we notice is that without some sort of border on the buttons, it is difficult to determine where the button boundaries are (you can assume the button is active on the label, but you do not know the actual bounds). It would be nice if we could add a border within the bounds of our button, especially in the case of black and white buttons.
Adding a Border
Were we to add a border, we would need a value to tell our function that the button needs a border. We will create the boolean variable hasBorder to deal with that and add it to our local variables at the beginning of the program.
local hasBorder = falseLet's talk about a border before we try and code it up. A border would be a one-wide strip around the inside perimeter of our button which could be of a different color than the button background itself. So, we will definitely need border background colors for pressed and normal button states. Once the border is drawn, the background and the label will have to be fit inside of it. Essentially, the button width and height will each need to be reduced by 2 (1 left border + 1 right border, 1 top border + 1 bottom border). Because we are going to change some of our button variables, we will need to make sure and restore them when we finish drawing the border. The border itself will take up a mimimum of 2x2, so if we are to have a label at all, the button size must be at least 3x3. So, for a border:
- At the beginning of the draw function, store the original values for width,height,startColumn and startRow
- The border will not display unless hasBorder is true
- The minimum width must be three – if it is less, it will need to be set to three.
- The minimum height must be three – if it is less, it will need to be set to three.
- If the monitor is black and white, only black and white colors can be used. In such a case, both the pressed and normal colors for the border should be white to insure the display of the border.
- If the monitor is color, normal and pressed background colors should be set depending on the value of isPressed.
- On the top and bottom rows of the border (which are the startRow and the startRow+height -1), the border will be for the full width of the button.
- For each row that is not the top or bottom row, a space in the startColumn needs to be displayed, and a space in the last column (startColumn + width -1) needs to be displayed.
- Once the border is drawn, the local values for startColumn and startRow will be increased by 1 each.
- Once the border is drawn, the local values for width and height will be reduced by 2 each.
- Once the label is drawn, if we drew a border (hasBorder==true) then reset width,height,startColumn and startRow back to original values (this will become unecessary later when we do some additional work).
Border Code
--In the variable declaration section, add

local hasBorder = false
local borderBackgroundPressed = colors.pink
local borderBackgroundNormal = colors.lightBlue

--in the draw function, after checking isPressed
	local width_old = width
	local height_old = height
	local startColumn_old = startColumn
	local startRow_old = startRow

--In the draw function, before setting colors for the button/text, add

	-- set border params and draw border if hasBorder
	if hasBorder == true then
		-- button must be at least 3x3, if not, make it so
		if width < 3 then
			width = 3
		end
		if height < 3 then
			height = 3
		end

		-- set border colors
		if not isPressed then
			if not display.isColor() then
				display.setBackgroundColor(colors.white)
			else
				display.setBackgroundColor(borderColorNormal)
			end
		else
			if not display.isColor() then
				display.setBackgroundColor(colors.white)
			else
				display.setBackgroundColor(borderColorPressed)
			end
		end

		-- draw button border
		display.setCursorPos(startColumn,startRow)
		display.write(string.rep(" ",width))
		for row = 2,height-1 do
			display.setCursorPos(startColumn,startRow+row -1)
			display.write(" ")
			display.setCursorPos(startColumn+width -1 ,startRow + row-1)
			display.write(" ")
		end
		display.setCursorPos(startColumn,startRow+height-1)
		display.write(string.rep(" ",width))

		-- reset startColumn,startRow,width,column to inset button and label
		startColumn=startColumn+1
		startRow = startRow +1
		width = width - 2
		height = height - 2
	end

-- in draw function, if hasBorder, after printing label, reset width,height,startColumn and startRow
	if hasBorder then
		width = width + 2
		height = height + 2
		startColumn = startColumn - 1
		startRow = startRow - 1
	end
Pastebin code for Solution: 9a5ukdYj
Now, when we display the same set of four buttons, we get a completely different look (one we can live with).
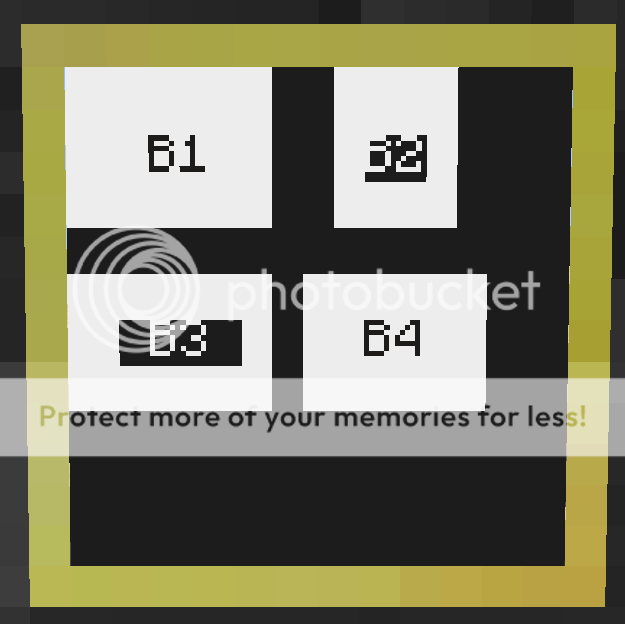
You will notice that the button "B2" is smaller than we might have guessed. But we have have fixed the problem, and we have the added benefit of beign able to add colorful borders to our buttons!
Turn Our Code into Even Better Functions
As it stands, our code has a bunch of variable declarations and one big function. It isn't very portable, and depending on what other things you write in your program, you may walk all over certain variables. Making multiple buttons is a lot of work with our existing code. We need to find a way to make it easier for us to declare multiple buttons and for us to place our code in other programs. Our code screams out for creating at least one table and at least one more function.
Creating a Table for the Button Variables
Tables are great for storing related information for easy recall. If you aren't comfortable with tables, hang on and we'll work through some things that might help you. Almost all of our local variables are related to a button – width, height, startColumn, colors, etc. One could imagine a table that looked something like this:
button = {
	length =10;
	height = 1;
	-- and so on
}

But we just as easily can populate a table like this:

[code]

button = {}
button.lenght = 10
button.height = 1
-- and so on
That's something we can readily put into a function. What if we made a function to create our button? We'd need to accept the parameters for the button and return a table of values representing all the values for our button. That way we would be able to create as many buttons as we like, getting each button back as a separate table of values. We'll include a value for whether the button is pressed. We already know all of the other values we need, we just need to include them in our function, and give our function a decent prototype that allows us to pass in our button values. Our create function would look like this:
local function createButton(
							width,
							height,
							label,
							backgroundColorNormal,
							backgroundColorPressed,
							textColorNormal,
							textColorPressed,
							hasBorder,
							borderColorNormal,
							borderColorPressed,
							startColumn,
							startRow,
							isPressed,
							defaultBackgroundColor,
							defaultTextColor
							)
	button = {}
	button.height=height or 1
	button.width=width or 1
	button.label=label or ""
	button.backgroundColorNormal=backgroundColorNormal or colors.black
	button.backgroundColorPressed=backgroundColorPressed or colors.white
	button.textColorNormal=textColorNormal or colors.white
	button.textColorPressed=textColorPressed or colors.black
	button.hasBorder = hasBorder or false
	button.borderColorNormal = borderColorNormal or backGroundColorNormal
	button.borderColorPressed = borderColorPressed or backGroundColorPressed
	button.defaultBackgroundColor = defaultBackgroundColor or colors.black
	button.defaultTextColor = defaultTextColor or colors.white
	button.startColumn = startColumn or 1
	button.startRow = startRow or 1
	button.isPressed=isPressed or false
	return button
end
Notice how for each variable we have assigned default values if they are not provided in the function call. Now any time we call the createButton() function, we will get a button table with all of the values set – even if we don't provide the values up front.
Draw Function – Revisited
Now that we can easily create a table of values with all of our button information, let's see what we can do to improve the draw() function.
We currently pass only the isPressed value into the draw function. Are there other arguments that would be useful to pass in? Clearly, the most important thing would be what button to draw. We will pass in our button table that we got from the createButton() function. It would be useful to tell the draw function which display device we want the button displayed on – that way we could easily display the button on multiple devices. We can pass in our handle for our monitor for that. We now know at least two things we will need to pass as arguments.
While we already are sending in a value for isPressed, we might want to use that value to reset our button's value for isPressed (button.isPressed) so that our button will "remember" what state it is in. We'll put in code to handle that.
Finally, even though we already know the button's startColumn and startRow, what if we change our mind? Let's send in arguments for startColumn and startRow. We can always choose to ignore them if we wish. So our function prototype should look like this:
local function draw(button,display,isPressed,startColumn,startRow)
Where the arguments are:
- button – our button table with all of the button values
- display – the display device to write the button to (like term or a peripheral handle – we've been using "attachedMonitor")
- isPressed – a boolean where true means we want the button displayed as pressed, and false means to display it as normal (not pressed)
- startColumn – the column to start displaying the button
- startRow – the row to start displaying the button
	if not button.width then
		error("Required button argmument missing or invalid.")
	end
Now that we have that out of the way, what about the rest of the arguments? The display is easy, we can always default to the term device.
display = display or term
As for isPressed, startColumn and startRow, we could pull their values from the button table if they are not supplied. For now, let's do that for display and isPressed. We need to remember that with isPressed, if the value is supplied, we want to reset our button.isPressed value. If it is not, we want to use our button.isPressed value.
	if isPressed == false or isPressed then
		button.isPressed = isPressed
	else
		isPressed = button.isPressed
	end
We had to treat isPressed differently than before becase its actual value could be false. The logical condition "not isPressed" could be true if isPressed is false or nil. The condition "isPressed == false" is true only if isPressed holds a value of false. So if isPressed holds a value, we will reset button.isPressed. If it does not, we will use button.isPressed to set our argument variable isPressed.
The values for the startColumn and startRow arguments deserve a bit of thought. If they are not supplied, it makes good sense to pull them from the button table (button.startColumn and button.startRow). But if they are supplied, that would indicate we want the button to be displayed there from now on (unless we change our minds), and we should perhaps update the analagous button values for future calls. We will set the button values first depending on whether startColumn and startRow values were supplied. We will then turn around and set the startColumn and startRow values to be the same as their button counterparts. While we are at it, we will supply the rest of the local variables from our manual code above. We play with these values in our code, and we will want temporary copies of them to play with. Our function prototpye and argument assignment now reads:
local function draw(button,display,isPressed,startColumn,startRow)
	if not button.width then
		error("Required button argmument missing or invalid.")
	end
	display = display or term
	if isPressed == false or isPressed then
		button.isPressed = isPressed
	else isPressed = button.isPressed
	end

	button.startColumn = startColumn or button.startColumn
	button.startRow = startRow or button.startRow
	startRow = button.startRow
	startColumn = button.startColumn

	local width = button.width
	local height = button.height
	local label = button.label
	local labelPad = 2
	local borderOffset =  0
Now all we need to do is take the code sections from our previous draw function above and add them in, making the following modifications:
- Wherever attachedMonitor appears, replace that with "display"
- Whenever we need a value from our button table, prefix the variable with "button."
- Add local variables for button table variables when we do not want modifications in the function to affect the table values (for example button.width should not be changed, nor should button.label – even though we do modify the local version in our function).
- because we are already creating local copies of the variables, get rid of the width_old,height_old,startColumn_old and startRow_old lines that we added when we created the border, as well as the code that restores the values at the end of the draw function.
New draw() Function
local function draw(display,isPressed,startColumn,startRow)
	if not button.width then
		error("Required button argmument missing or invalid.")
	end
	display = display or term
	if isPressed == false or isPressed then
		button.isPressed = isPressed
	else isPressed = button.isPressed
	end

	button.startColumn = startColumn or button.startColumn
	button.startRow = startRow or button.startRow
	startRow = button.startRow
	startColumn = button.startColumn

	local width = button.width
	local height = button.height
	local label = button.label
	local labelPad = 2

	-- set border params and draw border if hasBorder
	if button.hasBorder == true then
		-- button must be at least 3x3, if not, make it so
		if width < 3 then
			width = 3
		end
		if height < 3 then
			height = 3
		end

		-- set border colors
		if not isPressed then
			if not display.isColor() then
				display.setBackgroundColor(colors.white)
			else
				display.setBackgroundColor(button.borderColorNormal)
			end
		else
			if not display.isColor() then
				display.setBackgroundColor(colors.white)
			else
				display.setBackgroundColor(button.borderColorPressed)
			end
		end

		-- draw button border
		display.setCursorPos(startColumn,startRow)
		display.write(string.rep(" ",width))
		for row = 2,height-1 do
			display.setCursorPos(startColumn,button.startRow+row -1)
			display.write(" ")
			display.setCursorPos(startColumn+width -1 ,startRow + row-1)
			display.write(" ")
		end
		display.setCursorPos(startColumn,startRow+height-1)
		display.write(string.rep(" ",width))

		-- reset startColumn,startRow,width,column to inset button and label
		startColumn=startColumn+1
		startRow = startRow +1
		width = width - 2
		height = height - 2
	end

	--set button background and text colors
	if not isPressed then
		if not display.isColor() then
			display.setBackgroundColor(colors.black)
			display.setTextColor(colors.white)
		else
			display.setBackgroundColor(button.backgroundColorNormal)
			display.setTextColor(button.textColorNormal)
		end
	else
		if not display.isColor() then
			display.setBackgroundColor(colors.white)
			display.setTextColor(colors.black)
		else
			display.setBackgroundColor(button.backgroundColorPressed)
			display.setTextColor(button.textColorPressed)
		end
	end

	-- draw button background (will be inside border if there is one)
	for row = 1,height do
		--print(tostring(startColumn)..","..tostring(startRow-row))
		display.setCursorPos(startColumn,startRow + row -1)
		display.write(string.rep(" ",width))
	end

	-- prepare label, truncate label if necessary
	if width  < 3 then
		labelPad = 0
	end
	if #label > width - labelPad then
		label = label:sub(1,width - labelPad)
	end

	-- draw label
	display.setCursorPos(startColumn + math.floor((width - #label)/2),startRow + math.floor((height-1)/2))
	display.write(label)

	-- reset display to default colors
	display.setBackgroundColor(button.defaultBackgroundColor)
	display.setTextColor(button.defaultTextColor)
end
Making Our Code Portable
We have definitely come a long, long way. Believe it or not, we are almost done. We could quit right now and you would have a very useful piece of code consisting of two functions that you would copy into your programs to create and display buttons. But we can do much better, with very little work.
We would like to make our code for buttons easily portable from program to program. We've used Lua tables to store our button values, and while you may already know a lot about Lua tables, you may not know that tables can be used to store all sorts of things, not just variables. Tables can store functions as well.
We already created a funtion which returns a table of values. Here is the same concept with a widget:
local function Widget(name,description)
	local widget = {}
	widget.name = name or "Cool Widget";
	widget.desctiption = description or "This is a really cool widget."
	return widget
end
To print out the information in this table, we would normally do something of this sort:
widget = {
	name = "Cool Widget";
	desctiption = "This is a really cool widget."
}

print ("Name: "..widget.name)
print ("Description: "..widget.description)
But what if we turned this into a function which returned our widget as a table object containing values and the functions to use them (hint – like our button values and our draw function)?
local function Widget(name,description) = {
	local widget = {}
	widget.name = name or "Cool Widget";
	widget.desctiption = description or "This is a really cool widget."
	function widget.print()
	  print ("Name: "..tostring(widget.name))
	  print ("Description: "..tostring(widget.description))
	end
	return widget
	end
}
myWidget = Widget()
myWidget.print()
That is pretty neat. Notice we used a period (".") to reference the print function we created (widget.print()). The Widget function returns a table (which we stored in myWidget), and in the table is the print fuction. Therefore, we call the function with myWidget.print(), similar to how we get a value from a table. What is useful for our purpose is that the entirety of Widget – all of its data values and functions – are returned with the widget table. That makes this code highly portable to any program we want to use it in. In fact, if we stored it in its own file and simply loaded it in any program using os.dofile("ourWidgetCodeFile"), we would have full access to all of our cool routines without ever pasting anything.
Now that is way beyond cool! What this means is that as long as we use some sort of function which will return a table of values and functions, each table will behave exactly like an object. In Lua, this type of object is referred to as a "closure."
Can you see how we might want to do that with our buttons? We are going to make a Button() function which takes in our button variables as arguments and gives us back a button table that can draw itself on the display, can remember what state it is in (pressed or normal), can deal with borders and everything we have worked on. In fact, we have essentially done this already. Our createButton() function returns us a table we called "button." The only thing that is missing from the table is the draw() function which we have already written. All we need to do is include the draw function in the button table, We will modify the draw function slightly by changing its name and one of its arguments, and we will be all done.
Very Little Needs to Change – Here Are the Changes
Our current draw() function has as its first argument the button table we got from the createButton() function. Since we are going to include the draw function as part of the button table, we don't need that argument any longer. The only other change we will make is to the function's name: we will call it button.draw rather than just draw, because it is now part of the button table. As a final (and uncessary) change, we should rename the function "createButton" to just "Button", because it now represents a type of class (again, a "closure" in Lua) of our new Button object. The pastebin code for our new Button object is: PsNHBAsm.
And then we are done. We now have a fully functional Button object that we can use to create and display buttons.
Taking It Our for a Spin
To create a new button, all we need to do is call the Button() function with as many of the arguments specified as we care to give (remember we created defaults for everything). With the Button function as the start of your program (or using os.dofile("buttonFile") as your first line in your program), add the following lines of code:
--os.dofile("buttonFile") --if you are going to load the button object from a file you saved

local attachedMonitor = peripheral.wrap("top")
local myFirstButton = Button(
							10,3,  --width,height
							"OK", --label
							colors.blue,colors.red, -- background colors
							colors.white,colors.yellow, -- text colors
							true,colors.lightBlue, colors.pink, -- hasBorder, border colors
							1,1, -- starting location
							true, -- isPressed?
							colors.black,colors.white -- default colors
							)

local mySecondButton = Button(10,3,"OK")

myFirstButton.draw(attachedMonitor)
mySecondButton.draw(attachedMonitor,false,1,4)
sleep(3)
myFirstButton.draw(attachedMonitor,false)
mySecondButton.draw(attachedMonitor,true)
sleep(3)
myFirstButton.draw(attachedMonitor,true)
mySecondButton.draw(attachedMonitor,false)

attachedMonitor.setCursorPos(1,9)
print("Done.")
Pastebin Code for Part II Final Version with example buttons: U9nLu0Wh
Wrapping Up Part II
In Part II, we did a lot! We learned how to create a button, add a label to it, center the label and position it on the screen in any color we want. We added padding to our labels and the ability to display a border for our buttons, plus we dealt with all of the corner cases that messed up our displayed button. We turned all of our manual coding into a function which we could re-use. Finally, using the power of Lua tables, we learned how to create a closure object which has all of the button functionality built in, and is easily insertable into any of our code projects.
At this point, the only thing we need to work on is how to make our buttons do more than just display beautifully on our monitors. For that, we will explore using events in Part III, and we will finish our entire project in Part IV where we pull together everything we have learned to create our Monitor Button Touch Screen and Control Program.
(Go on to [url='http://www.computercraft.info/forums2/index.php?/topic/17133-the-complete-monitor-buttons-and-control-tutorial-part-iii/]Part III – Monitor Touch and Other Events[/url])[/size][/color][/b][/center]
Edited on 16 February 2014 - 10:33 PM
