What is it and who is it for?

Do you have a big sprawling base filled with glittering technology, but have become jaded by the repeated hauling of your filthy meat body through space to inspect things directly?
Do you enjoy having lasers projected directly on to your retinas? Who doesn't?
Do you obsess about power ratios and efficiency? Constantly worried that the lights are about to go out at any moment without warning?
Do you have security concerns? Would you like to know who has been snooping in your base, and would like to design countermeasures?
Do you have a big fat reactor and love to have it turn itself on and off as required?
Then look no further. For your convenience, DeadGlass leverages the Terminal Glasses from the OpenPeripherals/ComputerCraft mods to access a network of cheap computer relays. Just slip on this pair of comfy glasses to have information about your factory's operations displayed discreetly on-screen and be granted wireless redstone abilities, remote controls and more.
Main features
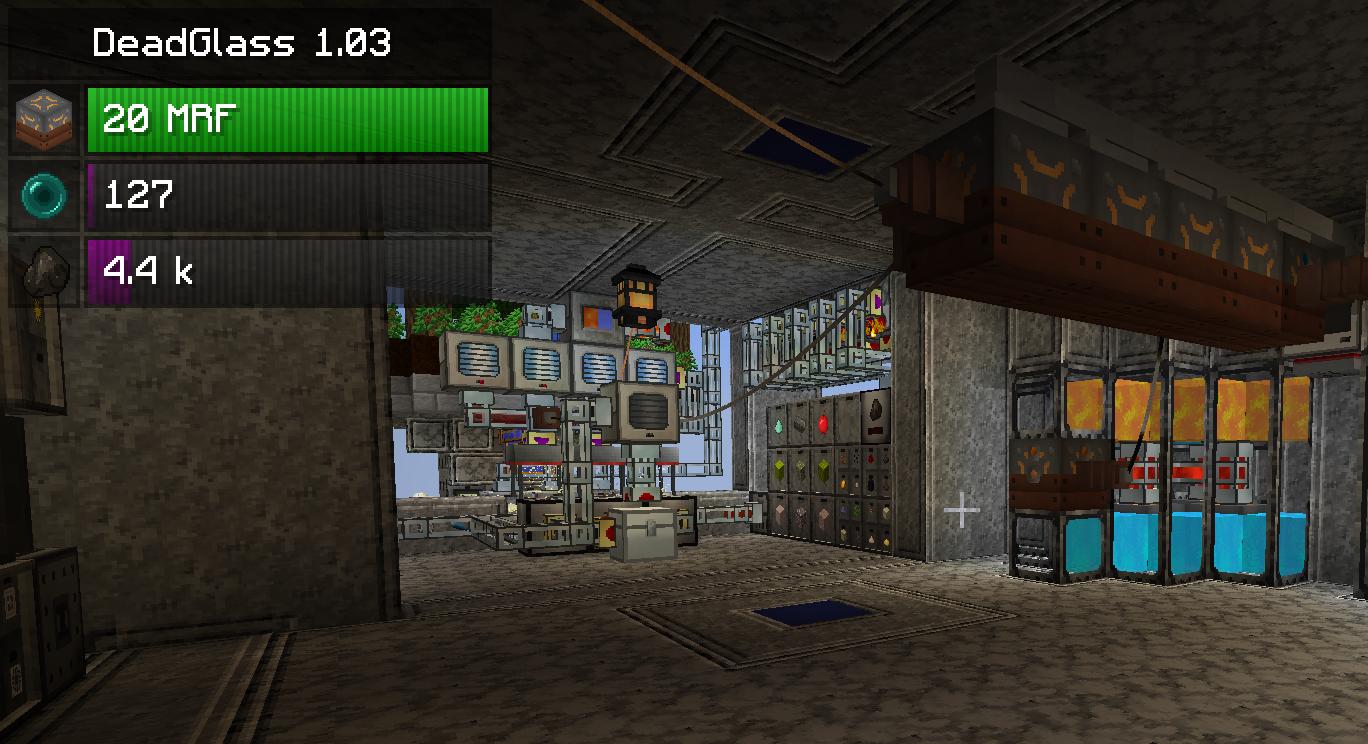
- Energy storage and generation stats sent straight to your HUD
- Item storage, ME Drive status at a glance
- Liquid tanks monitored on-screen
- Remote control wireless redstone system literally on your face
- Automatically govern RF-producing Big Reactors to save fuel
- The ability to recolour every light in your base with a word or two
- Multi-level security: sensor networks log player intrusions into your base and provide a basis for countermeasures, noteblocks will play alarms
- At least two CC Computers.
- At least two Wireless Modems.
- One pair of Terminal Glasses.
- One Terminal Glasses Bridge.
(Last edited 2/6/2016): The following devices are compatible.
- Power generation
- TE Dynamos
- Big Reactors (RF generating or steam generating)
- Big Reactors Turbines
- IC2 Nuclear Reactor
- Railcraft steam boilers and turbines
- Power storage batteries
- TE Energy Cells
- IC2 battery blocks (batbox, CESU, MFE, MFSU)
- AE2 Energy Cells and Network Controllers
- Immersive Engineering capacitors
- Item storage
- Vanilla chests
- AE2 ME Chest and ME Drive (shows green/orange/red status of cells)
- AE2 sky block chests
- Iron Chests (& gold, copper etc.)
- TE Caches
- JABBA Barrels
- MFR Deep Storage Units
- Liquid storage
- Railcraft iron and steel tanks (client/modem must be on a valve)
- IC2 Nuclear Pressure Vessel tanks (client/modem must be on a coolant port)
- AE2 certus quartz tanks
- Extra Utilities drums
- OpenBlocks tanks (only shows adjacent block, not whole tank)
- Buildcraft tanks (only shows adjacent block, not whole tank)
- TE portable tanks
- Miscellaneous
- TE Lumium Lamps
- Noteblocks
- Item Selectors
Wireless networks
Wireless networks are the easiest to organise - no cabling required. You just plonk a modem down. They do require an Ender Pearl each, and the lower in the world the modem is, the shorter the range it has, so they don't work well at the bottom of mines. Wireless range also drops by 75% during storms. A wireless modem at the top of the sky (y=255) in clear weather can broadcast to any other modem within a 384m radius sphere. At bedrock level during a storm, it's 4m. (Note for advanced users: it's possible to extend the range of your wireless network and fill gaps by using computers as wireless repeaters, use Google to find out how.)
Wired or wireless, the DeadGlass system uses a primitive kind of "server/client" model. You must have one (and only one) "server". This can be any CC computer but it's recommended you make an advanced (yellow) one for the server.
Craft the computer, a wireless modem and the Terminal Glasses Bridge. Place the computer somewhere central in your base and put the modem on one side and the TGB on another. Now craft some Terminal Glasses and right click with them on the Terminal Glasses Bridge. This pairs them with the bridge. Put them on - but you won't see anything just yet.

Right click on the computer. You'll get a flashing command prompt.
DeadGlass is set up to update itself automatically, so when Deadlock adds new stuff and fixes bugs, the computers will automatically fetch the latest version whenever the chunk they are in is loaded. So you only need to set up each individual computer once.
First, you have to manually download the update script. Type the following (or you can cut and paste from this page, Ctrl-C and Ctrl-V for Windows users):
pastebin get A8TbGF8s startup
To set the server running, use the startup command you just installed:
startup
You should see a "DeadGlass" box appear top left, if you're still wearing the glasses.
The server will start and update itself from now on whenever it's chunkloaded. If there's no modem or TBG, the server won't run and it'll nag you. Place the required peripherals and then run the startup command again.

Now you need some "clients". These are other computers which can be placed near machines or blocks you want to monitor. The process is pretty similar. Let's say you want to monitor an MFSU. Craft another computer (a grey basic one is fine) and a wireless modem. Place the computer directly adjacent to the MFSU, and place the wireless modem on another side of the computer.

Download the client startup script by typing the following:
pastebin get nxazpGwV startup
At this point you can optionally give the client a label. You don't have to, and it will name itself "dgclient" if you don't. There are some optional commands that rely on naming clients. But you can always rename them later.
label set MFSUmonitor
And then run the client for the first time with the startup command:
startup
After a short delay, if you're still wearing the glasses, you should start seeing an energy capacity bar on the left side of your screen. Welcome to DeadGlass!
The process is the same for any other compatible machine. You only have to install the script once per new client computer. If a computer stops for some reason, or if you want to manually reboot it, open the screen and hold down Ctrl-R to reboot. To relabel a client, open the terminal and hold down Ctrl-T until the software terminates, then enter the label command, and then hold Ctrl-R to reboot.
Wired networks
If you don't have any Ender Pearls, or if you're deep underground, or your base is huge, or you are just plain paranoid about wardrivers, you can use a wired network as well. The principle is exactly the same as above, but uses a wired modem and cables instead of wireless. When you've placed both modems, attach the client's modem to the server's modem with Network Cable. Then right click on each modem to activate it - it'll turn red.

The disadvantage of wired networking is that you have to run network cable everywhere, but there are lots of advantages as well. Unlike wireless, the range isn't affected by height or the weather: network cables can stretch for 256 blocks. Another big advantage is that while all clients will monitor any machine that they're placed directly next to, that limits you to maximum of five faces on the client (and in a very improbable arrangement). With wired networks, you can also attach a wired modem directly to the side of most machines, meaning that one client could monitor a whole bank of them.
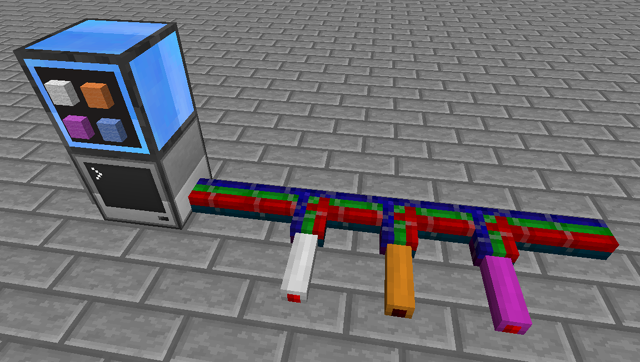
You can (and probably should) mix wired and wireless. Both clients and servers will attach to more than one modem. As long as every client can reach the server somehow, it'll all hang together. Below is a picture of a server (the yellow advanced computer, bottom) which is both wired and wireless, talking to a wireless-only client placed directly next to a machine (left), a wired-only client which is also wired to a bank of machines (centre), and a wireless client which is also wired directly to a bank of cells (right).

There are some blocks that a wired modem can't attach to directly, usually because they're not fully block-like (eg. chests), but sometimes because they are from a mod - IC2 battery blocks are the main example. There's a way around this - a block called the Peripheral Proxy. Place the PP with the green arrows facing the machine or block you want to monitor. Then attach the modem to the back of it.

Advanced networking
It's possible to boost wireless range by using computers set up as "repeaters". Search for ComputerCraft documentation to find out how to do this. Remember that repeaters are subject to the same wireless range mechanics, ie. affected by height and weather.
Sensors
Sensors can be placed either directly next to a client, or they can be wired to one remotely by using Proxy Peripherals.

Sensors scan for a radius of five blocks. Any player entering their radius is logged on the DG server computer. Furthermore, the client that the sensors are attached to will emit coloured redstone signals based on a security rating that you specify. See commands below for more info.
Miscellaneous
You can control redstone signals emitted by clients - both vanilla and bundled/coloured redstone - with chat commands. This can be for every client on the network or just specific ones. You can also create in-game controls with an Item Selector peripheral. Use coloured wool, stained glass or stained clay in the Selector to toggle the coloured redstone outputs for that particular DG client. Use redstone dusts, blocks or torchess in the Selector to toggle regular redstone output.

You can also change the colour of TE Lumium lamps. The lamps must be either directly adjacent to a client or attached remotely with a wired modem.
Finally you can operate some machines such as Big Reactors remotely with commands as well. Any Big Reactor in RF-producing (passively cooled mode) will be automatically governed by the client computer - if the internal battery reaches 90% capacity, the reactor will be turned off, and turned back on when the battery reaches 10%.
You can also install note blocks around your network. These will play pings and alarms when any sensors on the network detect neutral or blacklisted players.
For more info on these features, see the Command list below or search this thread.
Commands
Chatbox
The following commands can only be issued while you're wearing the glasses. Glasses commands all start with two dollar signs ($$).
$$small, $$medium, $$large
Changes the width of the display. This is set to medium by default. The size of the display also depends on your Options > Video Settings > GUI Scale setting.
$$players
List the players that have been detected by your sensor network within the last month.
$$lamps ABC123 [clientlabel]
Change the colour of TE Lumium Lamps on your network. The middle number is a hex RGB colour. The client label parameter is optional - if specified, only clients with that label will execute the command.
$$brrods 0-100 [clientlabel]
Control the insertion level of your Big Reactors from afar. If no client label is specified then every reactor on the network is affected.
$$brflow 0-2000 [clientlabel]
Control the steam flow rate for Big Reactors Turbines from afar. If no client label is specified then every turbine on the network is affected.
$$redstone on/off [clientlabel]
$$credstone colourname on/off [clientlabel]
Tell clients on the network to emit a redstone signal. Again, the optional clientlabel specifies it only for clients with that label. The $$redstone command emits normal redstone at max strength (15). The $$credstone command needs a colour specified, any of the typical 16 Minecraft dye names, and will emit it only on that Project Red or MinefactoryReloaded colour channel. You must connect a bundled cable to the client computer first, you can't attach one-colour insulated cables directly.
$$whitelist
$$blacklist
List the players currently on your sensor whitelist and blacklist. These are lists of players that affect the way that sensors behave. A whitelisted player entering range of an active sensor will cause the client computer monitoring the sensor (not the sensor itself) to emit a green redstone signal on a bundled cable channel. A blacklisted player will trigger a red signal. A player in neither list will emit a yellow signal.
$$whitelist add/remove name
$$blacklist add/remove name
Add and remove player names from your lists. You also will go on ze list.
$$reset
Redraws everything on the glasses HUD, to get rid of glitches. Like a "soft reboot".
$$reboot
Tell the server to do a hard reboot. Last resort. Won't work if the server has crashed. Won't reboot crashed clients.
Labelling computers
To re-label a client computer, open its screen and hold down Ctrl-T until you get the flashing command prompt. Type the following, replacing MyLabel with something useful:
label set MyLabel
Then hold down Ctrl-R until the client reboots and resumes monitoring.
Can you make it work with another machine/block?
Possibly - just post a request below!
Some mods work better than others. The mods with the most compatibility are TE, Railcraft, BC, Enderstorage, Forestry, MinefactoryReloaded and a couple of others. Non-supported mods can sometimes be made to work if they provide standard Minecraft or Forge facilities like inventories, tanks, RF power etc.
Things already attempted that didn't work out were: Extra Utilities generators; IC2 non-nuclear generators; anything in EnderIO; Storage Drawers.
Known issues / bugs
- There are some rare glitches with liquid tanks, although the situations are pretty rare. If you have a lot of different types of tanks with a lot of different types of fluids all draining back and forth into each other, all connected to the same client, weirdness will probably result. Workaround: don't do this. If you have tanks that drain into each other a lot, monitor them with separate client computers.
- Weird things might happen if you break and add a lot of monitored machines while the client is still running. Some displays might get frozen or duplicated. It might sort itself out, but if that happens, reboot the server and the affected clients. It's best to turn a client off while you reorganise your machines.
- The DeadGlass network is utterly and completely insecure, wide-open to hackers.


